
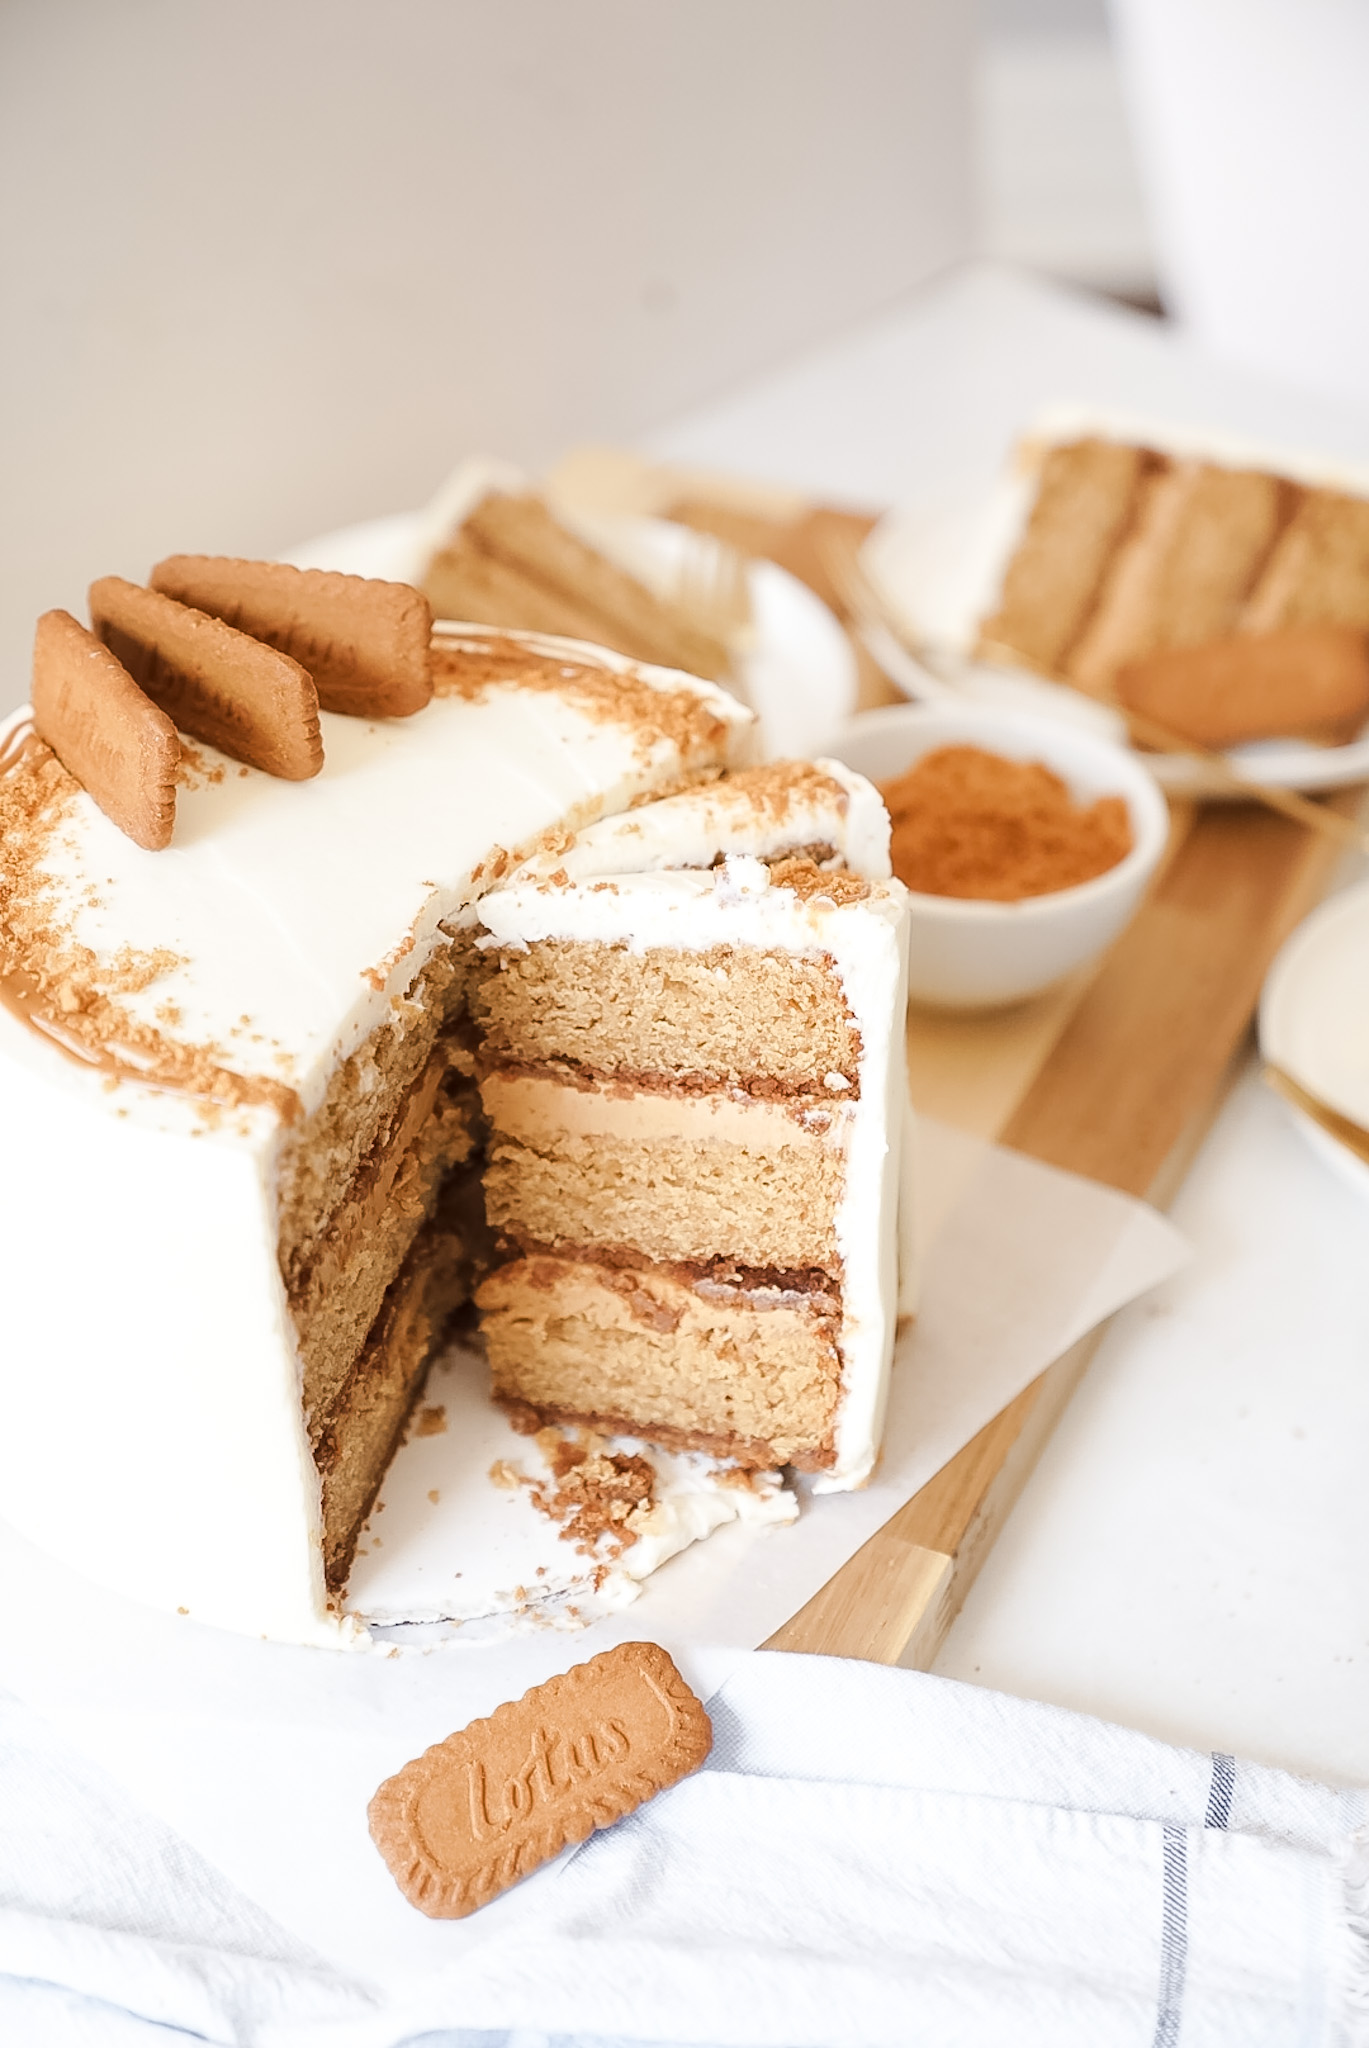
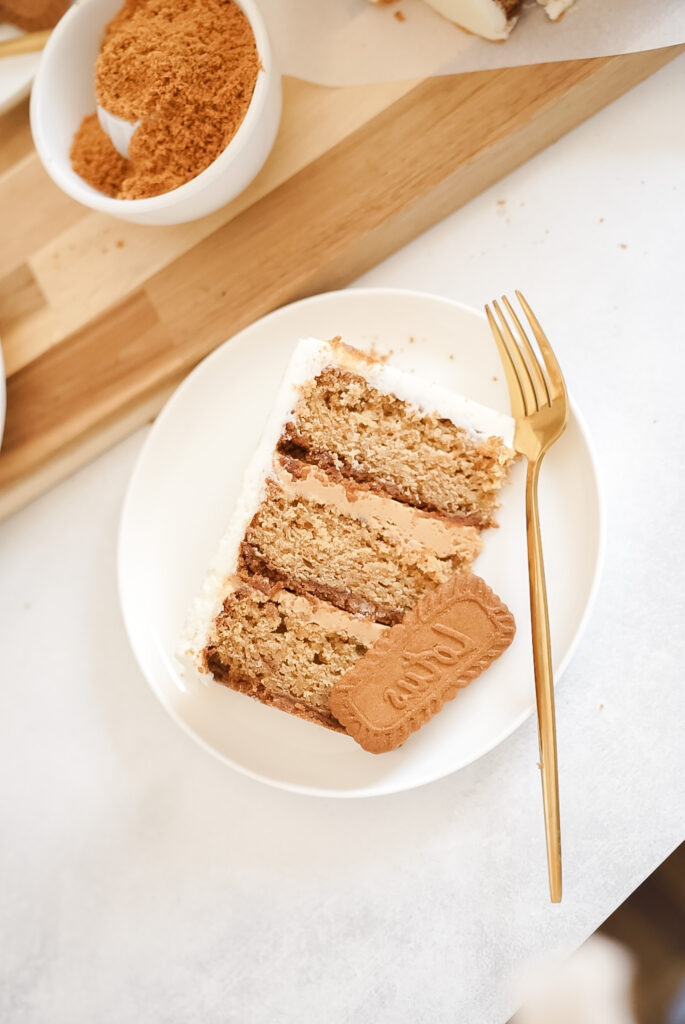
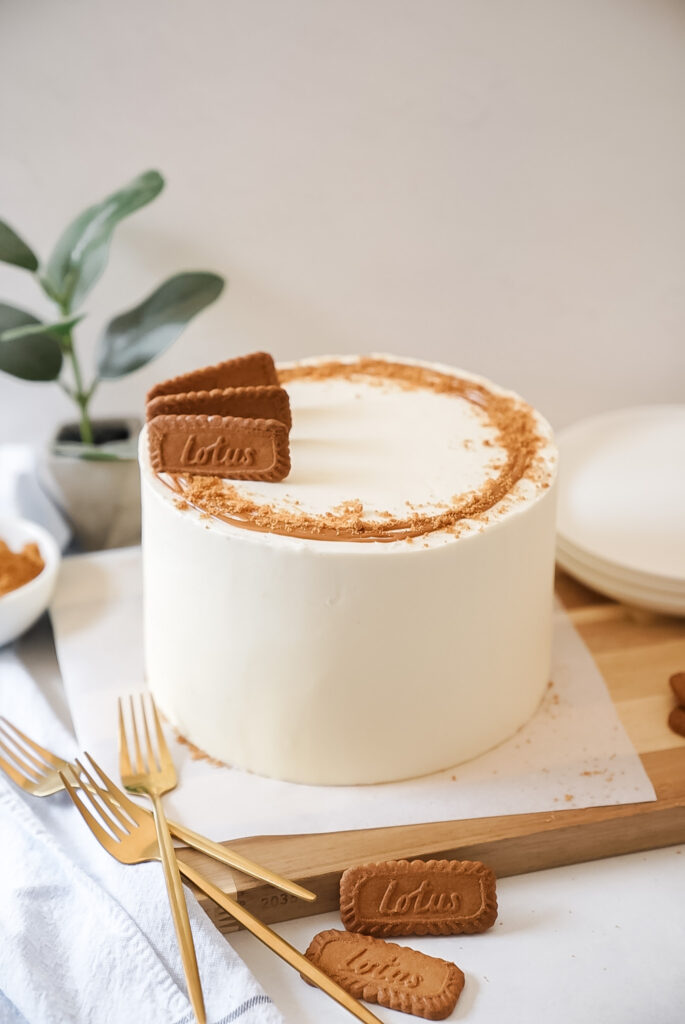
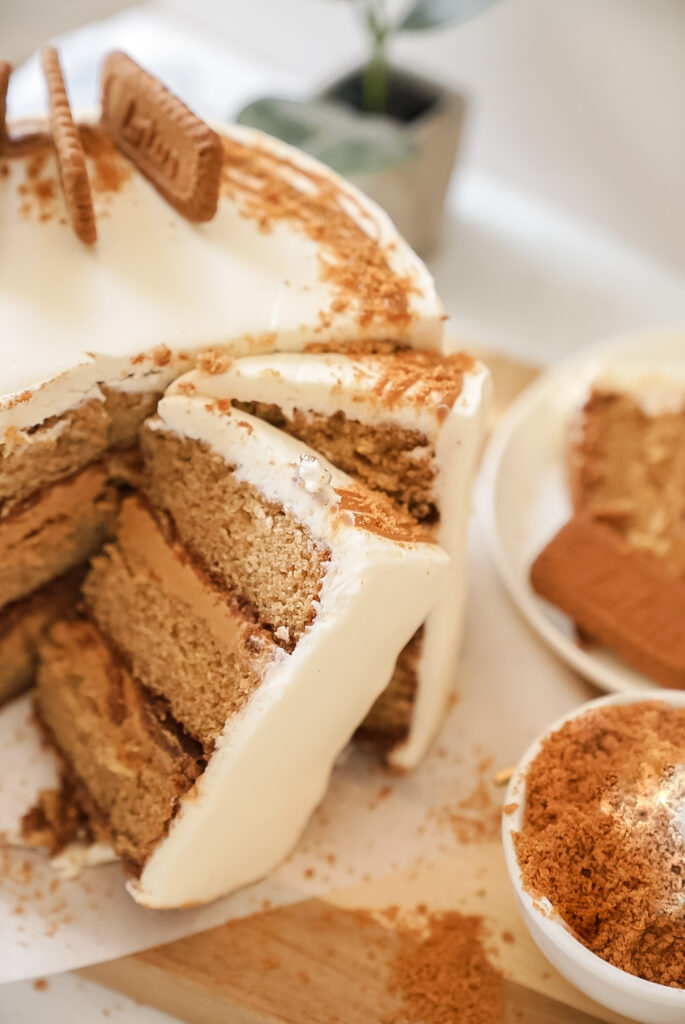
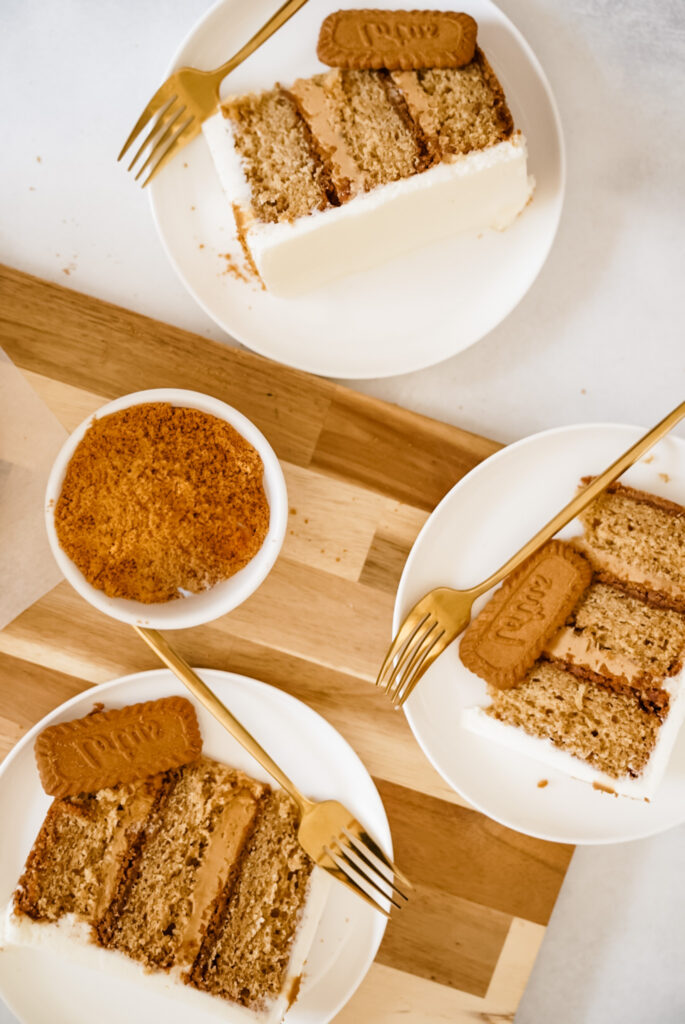
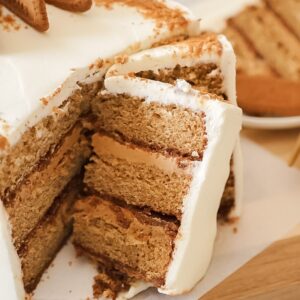
If you love cookie butter or Biscoff cookies, this Ultimate Biscoff Cake is for you! This cake has three layers of Biscoff crumbs right in the cake, a Biscoff crust, a creamy cookie butter filling, and finally, it's topped with a vanilla buttercream. This cake is a DREAM!
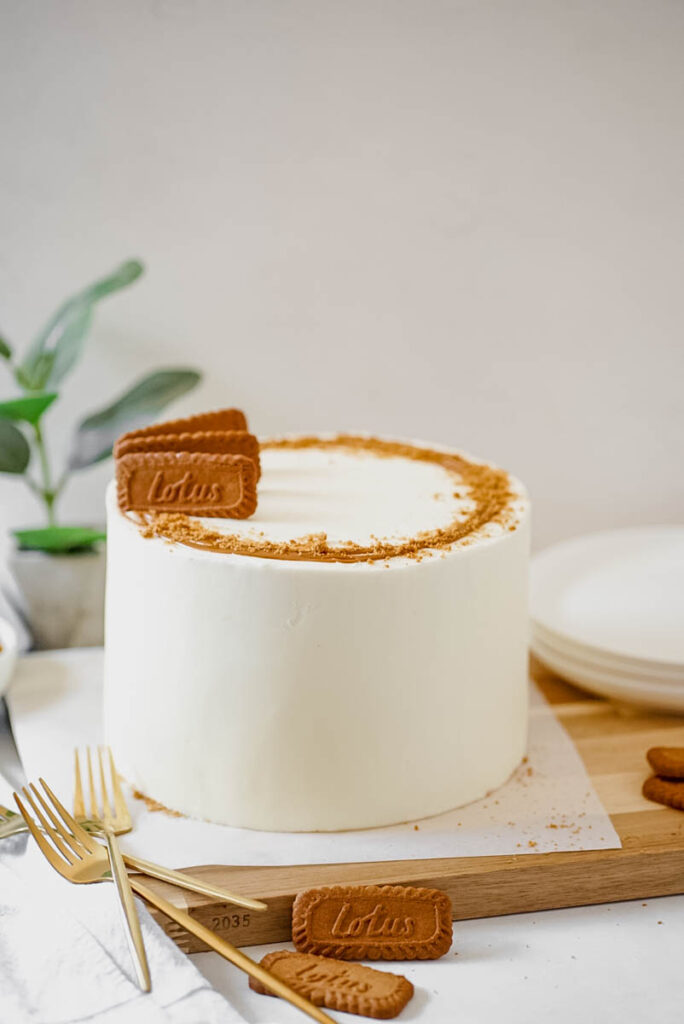
You need to make this Biscoff Cake ASAP! This cake is a Biscoff lovers biggest dream. It has a Biscoff cookie crust, biscoff cake layers, cookie butter filling, and vanilla buttercream. The layers are so fluffy and the filling is perfection Try bringing this cake to your next get together and I guarantee you will be asked to bring it from now on!
If you are still looking for other recipes to try check these out!
Cinnamon Dulce De Leche Cake Brown Butter Chocolate Chip Blondie Graham Cracker Cake
Jump to:
Why this recipe is so amazing
- Biscoff cookie crust-It is made with Biscoff cookies, butter, and sugar. This cookie crust gives the cake a deliciously crunchy texture.
- Tender Biscoff layers-I put ground up Biscoff cookies right into the cake layers to give them that delicious Biscoff taste.
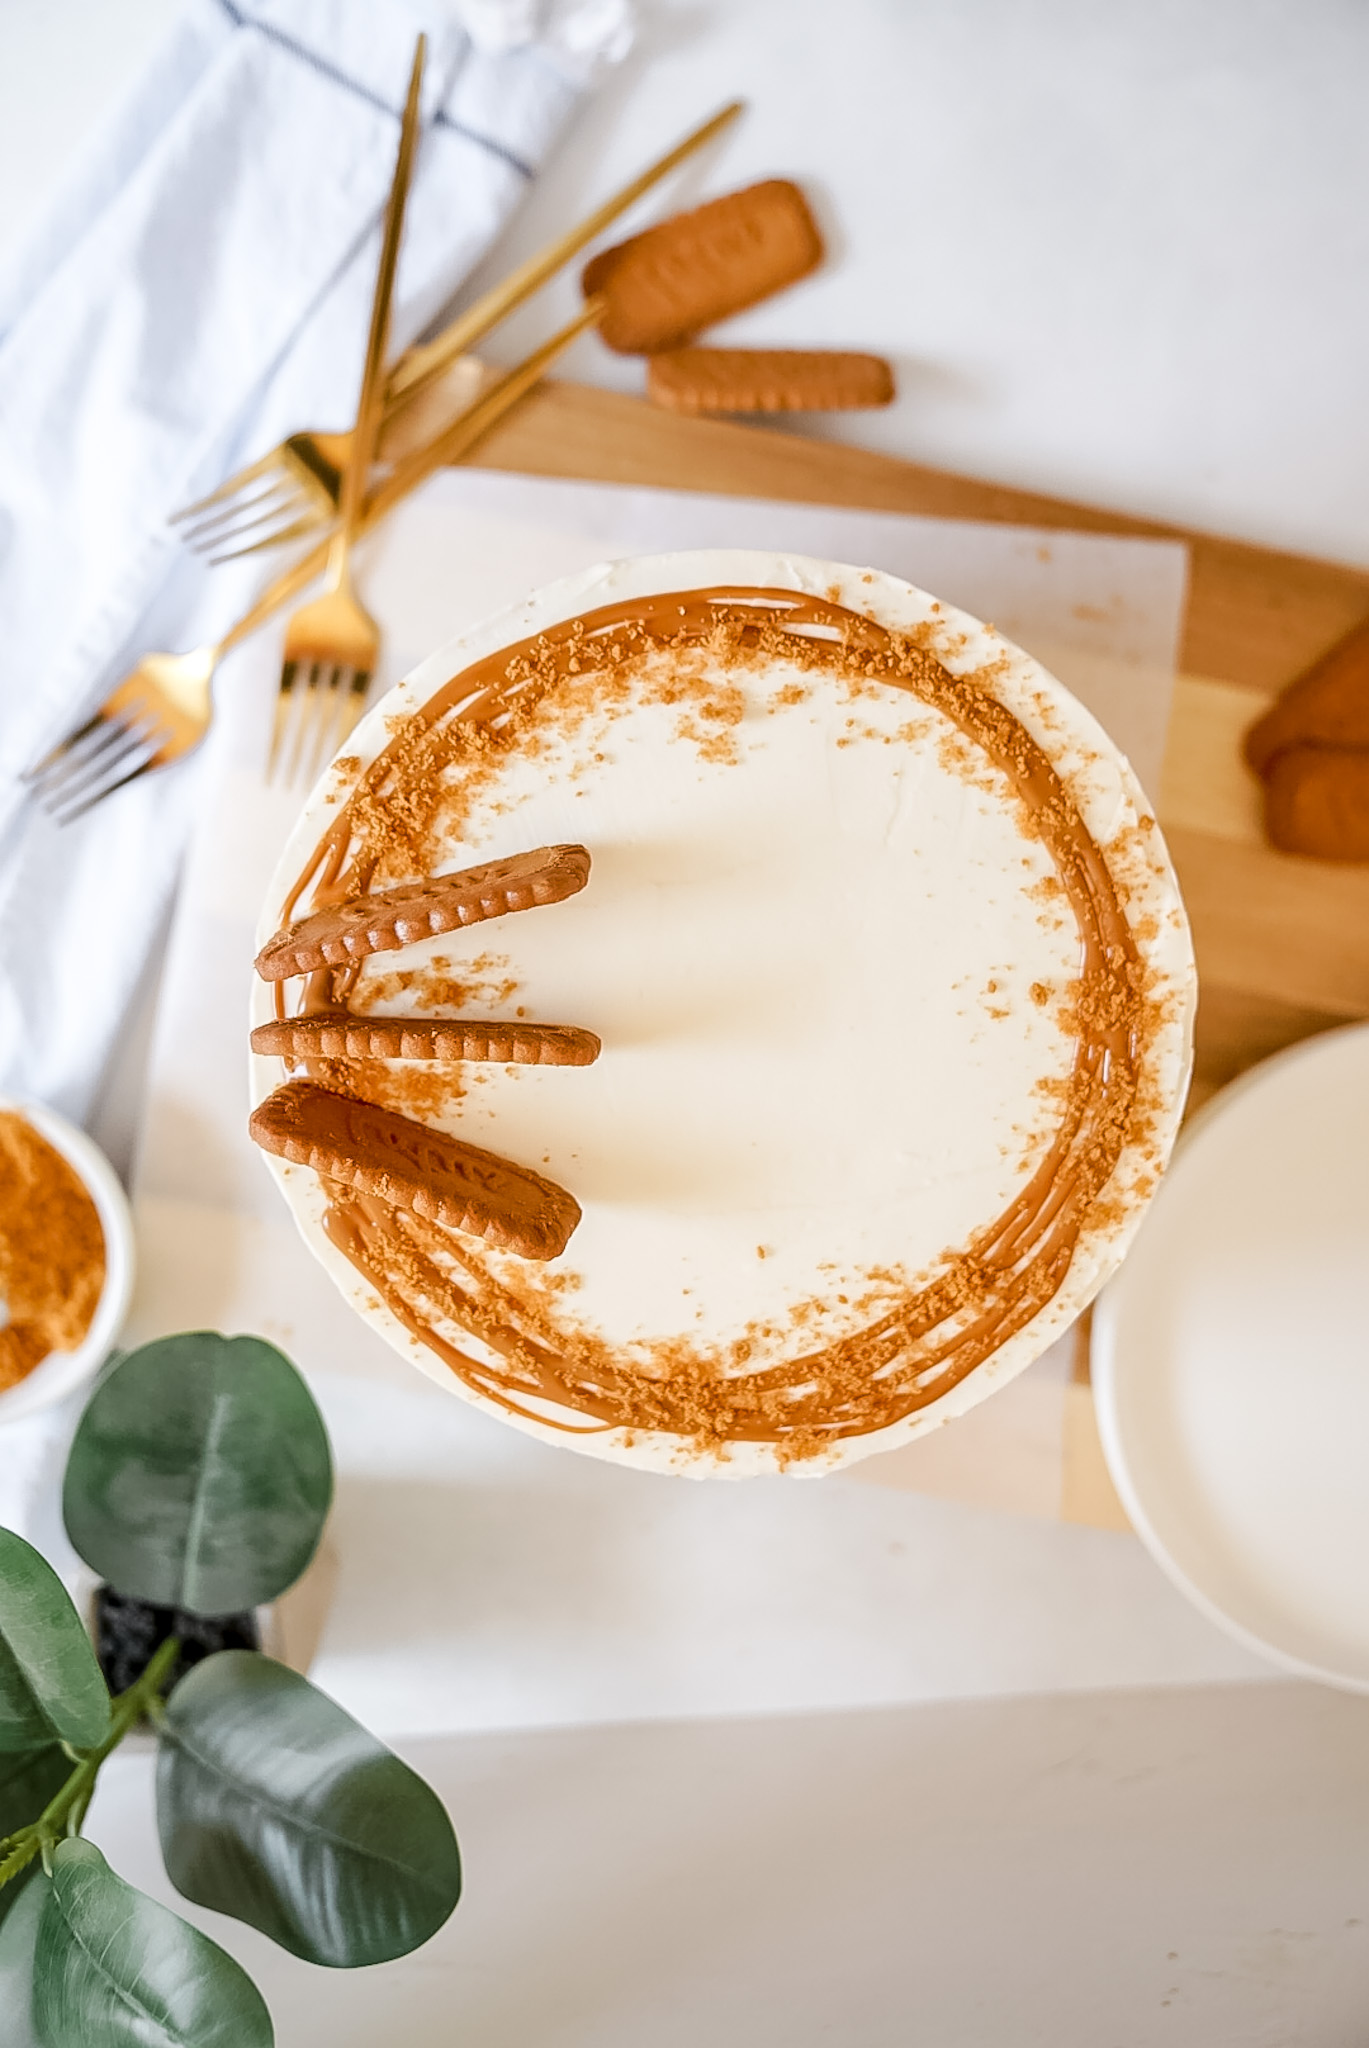
- Cookie butter filling-Thiscreamy cookie butter filling is made with cookie butter spread, powdered sugar, cream, and butter. Don't be surprised if you end up licking the bowl clean on this one.
- Vanilla buttercream-I decided to go basic on the frosting so it wouldn't conflict with the delicious flavor of the Biscoff cake layers. A vanilla buttercream is the perfect blend.
- Layered cake-This is a three layer 8 inch cake, but if you have 4, 6 inch pans, that will also work.
- The perfect dessert for any occasion-Whether this is a dessert just for the family or a fun friend get together, you're going to need this one in your life.
Ingredient notes
Here are some things that you will need to make this recipe:
- Biscoff cookies-I like to use Lotus brand Biscoff cookies, but if you find another brand, like Speculoos, you can totally use that too.
- Unsalted butter-This recipe uses a lot of butter. In fact, each element of this cake has butter in it. For the cake layers, make sure to pull the butter out of the fridge so it is at room temperature when you begin making the cake. This is so important!!
- Large eggs-The eggs need to be pulled out 2-4 hours before you make your cake batter.
- Cookie Butter spread-I like to use Lotus, but Walmart and Trader Joe's both have brands that are great too!
- Buttermilk-This recipe uses a lot more buttermilk than most of my other recipes. Make sure to pull it out at least 2 hours before you start baking the cake batter.
- Powdered sugar-You need to sift the powdered sugar when you make your vanilla buttercream. It will your cake so much smoother.
Substitutions
Although I don't recommend substitutions, if you are ever in a pinch, here are a few things you can substitute:
Vanilla extract-You can always use vanilla flavoring or imitation vanilla.
Buttermilk-You can use whole milk and lemon. For every cup of milk, add one Tablespoon of lemon juice. Just let it sit for 15 minutes before using.
Brown sugar-If you are low on light brown sugar, you can use white granulated sugar.
Step by step instructions:
STEP 1: Beat the butter, sugar, and oil. Beat these ingredients on high for 5 minutes to get a light and fluffy texture. This creates air pockets in your cake that also help it rise. I recommend beating them for 2 minutes, then scraping down the sides, and beating for the remaining 3 minutes.
STEP 2: Beat the eggs. Beating the eggs after each addition is considered the "creaming method." You'll want to scrape down the bowl after each egg to really ensure that they are creamed into the butter and sugar.
STEP 3: Add the vanilla extract. After adding the eggs, add the vanilla extract.
Step 4: Add in the dry ingredients and buttermilk. Alternate these and mix on low.
Step 6: Bake the cake. Bake the cake layers low and slow for 36-41 minutes, depending on your oven. Mine took 39 minutes
Step 7: Make the filling. Make the cookie butter filling by beating all the ingredients on high for 3-4 minutes.
Step 8: Make the vanilla buttercream. Make the vanilla buttercream the same way you make the filling. I just beat it a little longer (5-6 minutes).
Step 9: Assemble the cake. Assemble the cake, do a crumb coat, and finish frosting!
ASSEMBLING THE CAKE
- Place a small amount of frosting on the center of the cake board. This will act like a glue to help you keep your cake on the cake board while you decorate.
- Make sure your cakes are level. Place the first cake layer on a cake board with the Biscoff crust layer on the bottom.
- Make sure your layers are cold or frozen, this will help reduce crumbs and make it so the layers don't slide around.
- Spread about half of the filling onto the center of the cake with the back of a spoon.
- Place a second cake layer on top of the filling, bottom side down, and repeat steps 2 and 3. Place the final cake layer, bottom side down, on the second layer of filling.
- Crumb coat. This is SOOO important, this locks those pesky crumbs in!
Expert Baking Tips
- When you are making the cake batter, make sure to really cream the butter and the sugar. I can't stress this enough. This helps create air pockets in your cake layers that also help it rise.
- Use high quality cake pans. This helps prevent your cake layers from browning on the side. I always use Fat Daddios.
- I say this a lot, but there is a reason. USE ROOM TEMP ingredients! That is a must! Make sure all of your ingredients are at the same temp!
- To get a creamy and smooth buttercream, When you finish making the buttercream, add a Tablespoon of cream to your buttercream and beat by hand with a rubber spatula to get all the air bubbles out.
- Do a crumb coat. Don't skip out on this step. It totally helps secure the crumbs onto the cake and makes decorating easier.
- Use a turn table to help decorate your cake.
- I love using an offset spatula to help spread the buttercream onto the sides of the cake.
Storing
If I am dividing my cake making into multiple days, I bake my cake layers and then cool them and wrap them with plastic wrap and store them in the fridge or freezer. This help reduce crumbs and also makes it so the layers don't slide around when decorating. They can be stored in the fridge for 3-5 days.
FREEZING
If you want to make the entire cake ahead of time, you can freeze the decorated cake by simply wrapping it with plastic wrap and popping it in the freezer. If you want to store it for longer than a few days, put a layer of aluminum foil over the plastic wrap. It can be stored in the freezer like this for up to 6 months. Once you are ready to serve the cake, pull it out of the freezer and thaw it in the fridge to help decrease condensation.
If you love Ultimate Biscoff Cake, here are other recipes you should try:
Banana Biscoff Bread Cookie Dough Brownies Pumpkin Biscoff Cake
Remember LEAVE A 5 STAR EVIEW AND A COMMENT if you love the recipe or any questions. Follow me on Instagram, Pinterest, and TikTok. I post so many fun things on all platforms!
Recipe
Ulitmate Biscoff Cake
Ingredients
For the Biscoff crust
- 32 Biscoff cookies pulverized to a fine crumb
- ½ cup unsalted butter melted
- ⅓ cup granulated sugar
For the Biscoff cake layers
- 22 Biscoff Cookies pulverized to a fine crumb
- 2 ¼ cups all-purpose flour
- 2 teaspoons baking powder
- 1 teaspoon baking soda
- 1 teaspoon salt
- 1 cup unsalted butter room temperature
- 1 ⅔ cups light brown sugar packed
- ¼ cup vegetable oil
- 4 large or extra large eggs at room temperature
- 1 teaspoon vanilla
- 2 cups buttermilk at room temperature
For the Cookie Butter filling
- ½ cup unsalted butter at room temperature
- 1 ½ cups Biscoff cookie butter spread
- 1 ½ cups powdered sugar
- 2 Tablespoons heavy cream
- tiniest pinch of salt
For the vanilla buttercream
- 2 cups unsalted butter room temperature
- 6 cups powdered sugar sifted
- ⅓ cup heavy whipping cream
- 2 teaspoons pure vanilla extract
- ½ teaspoon salt
Instructions
For the crust
- Preheat the oven to 325 degrees F. Using 3, 8 inch cake pans, spray the bottom of the cake pan with cooking spray, line with parchment paper, and spray again. Set aside.
- In a blender, pulverize the Biscoff cookies to resemble a fine crumb.
- In a medium sized bowl, whisk the melted butter, sugar, and pulverized Biscoff cookies until they are evenly combined. You should be able to grab the mixture by hand it have it stick together.32 Biscoff cookies, ⅓ cup granulated sugar, ½ cup unsalted butter
- Pour about ¾ cup of the mixture into each prepped cake pan. With a flat surface, firmly and evenly press the Biscoff mixture into each pan, making sure to get it in the corners too. Bake for 8 minutes. Let them cool for 10 minutes before putting the batter into them.
- While the layers are baking, start making the Biscoff cake batter.
For the Biscoff cake
- Place the Biscoff cookies in a blender and blend until the cookies are finely ground into a fine crumb.
- In a medium-sized bowl, whisk together the Biscoff crumbs, all-purpose flour, baking powder, baking soda, and salt until evenly combined.22 Biscoff Cookies, 2 ¼ cups all-purpose flour, 2 teaspoons baking powder, 1 teaspoon baking soda, 1 teaspoon salt
- In the bowl of a stand mixer fitted the paddle attachment, cream the butter, brown sugar, and oil on medium speed until light and fluffy, about 5 minutes. The mixture will start looking light in color.1 cup unsalted butter, 1 ⅔ cups light brown sugar, ¼ cup vegetable oil
- Add the eggs, one at a time, beating on medium speed for 30 second after each addition. Add the vanilla and mix on the lowest speed, just until combined.4 large or extra large eggs at room temperature, 1 teaspoon vanilla
- With the mixer on the lowest speed, add ⅓ of the dry ingredients and half of the buttermilk. Mix just until combined. Repeat this step. Add the rest of the flour mixture and continue to mix on the lowest speed until the flour and the buttermilk have all been incorporated. With a rubber spatula scrape down the sides and bottom of the bowl and slowly mix by hand.2 cups buttermilk at room temperature
- Divide the batter evenly among your pans, (about 20 ounces in each pan) and bake for about 35-39 minutes. To check, insert a toothpick. Once little to no crumbs come out on your toothpick, the cakes are done. (my oven runs a little cooler than most, so mine took 39 minutes) Because of the cookies and the brown sugar in this recipe, the cake layers will brown on top. That is normal and what you want.
- After they are out of the oven, I let mine cool for 15 minutes. Then I transfer them onto a wire rack to finish cooling. Let them come to room temperature before wrapping them in plastic wrap and freezing or refrigerating.
For the cookie butter filling
- In a stand mixer fitted with a paddle attachment, beat the butter and Biscoff spread, cream, powdered sugar, and salt on medium speed until light and fluffy, about 3 minutes.½ cup unsalted butter at room temperature, 1 ½ cups Biscoff cookie butter spread, 1 ½ cups powdered sugar, 2 Tablespoons heavy cream, tiniest pinch of salt
For the vanilla buttercream
- In a bowl fitted with a paddle attachment, beat the butter on medium-high speed for about 3 minutes.2 cups unsalted butter, 6 cups powdered sugar, ⅓ cup heavy whipping cream, 2 teaspoons pure vanilla extract, ½ teaspoon salt
- Add powdered sugar, vanilla extract, salt and heavy cream. Mix on low. Once incorporated, beat on high for 4-5 minutes.
- Before frosting your cake, use a wooden spoon or rubber spatula to hand mix the frosting to push out any air bubbles.
Assembly
- Smear a dollop of frosting in the middle of the cake board to act as a glue. Place the first cake layer on a cake board, with the Biscoff crust layer on the bottom. Gently and evenly spread half of the cookie butter filling, followed by a some melted cookie butter. (The melted cookie butter is optional)
- Repeat with the second layer of cake.
- Place your final cake layer, with the Biscoff crust on the bottom, right on top of the second layer of filling.
- Apply a thin layer of the vanilla buttercream around the entire cake and freeze the cake for 10 to 15 minutes.
- Once the crumb coat is set, finish frosting and decorating the cake with the remaining vanilla buttercream. Garnish with Biscoff cookie crumbs.
Janice says
I've made this cake a couple of times already, it's soo good! If your a cookie butter/biscoff aficionado like me and my fam then you'll like this cake. My sister requested it (again) for her bday!
Natalie Ouimet says
Can I use the reverse creaming method with this biscoff cake recipe?
Molly Murphy says
I have not tested that before! You can totally try it out, and let me know how it goes!
-Molly
Aminah says
I made this cake for my sisters birthday. EVERYONE loved it and felt it was one of the best cakes they’ve ever eaten
Sara says
Could you halve this for a 6 inch cake?
Molly Murphy says
yes! absolutely!
Kathleen says
This recipe worked perfectly. It’s really sweet and tastes like biscoff. Unique!