
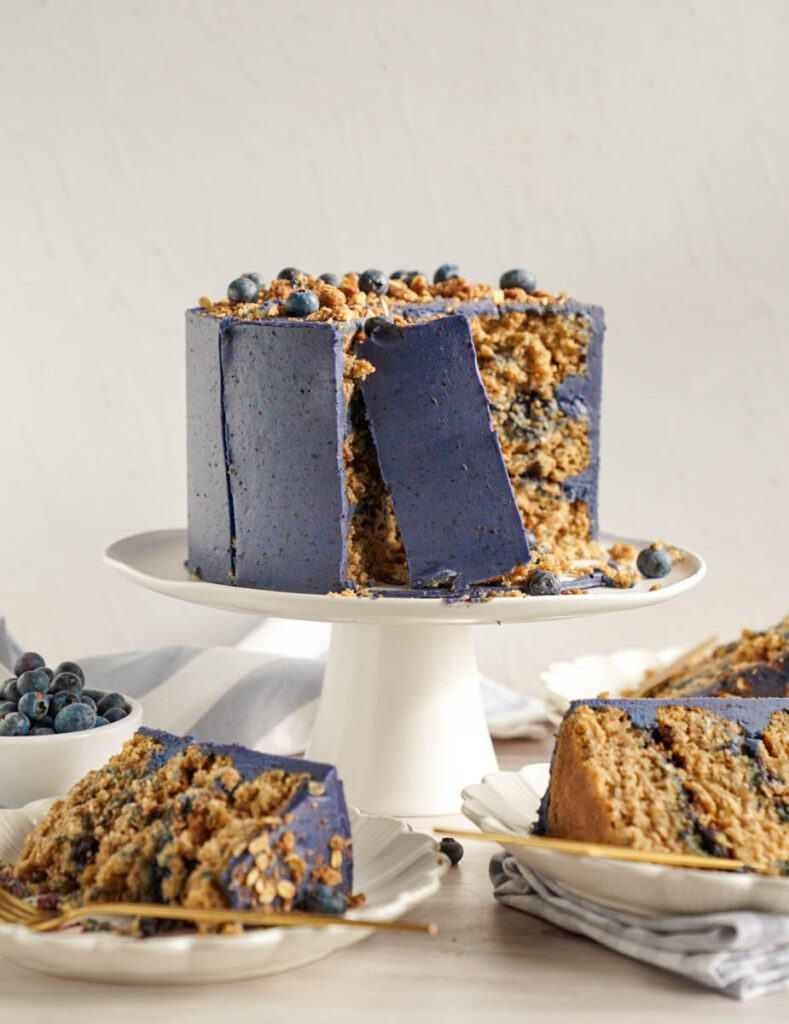
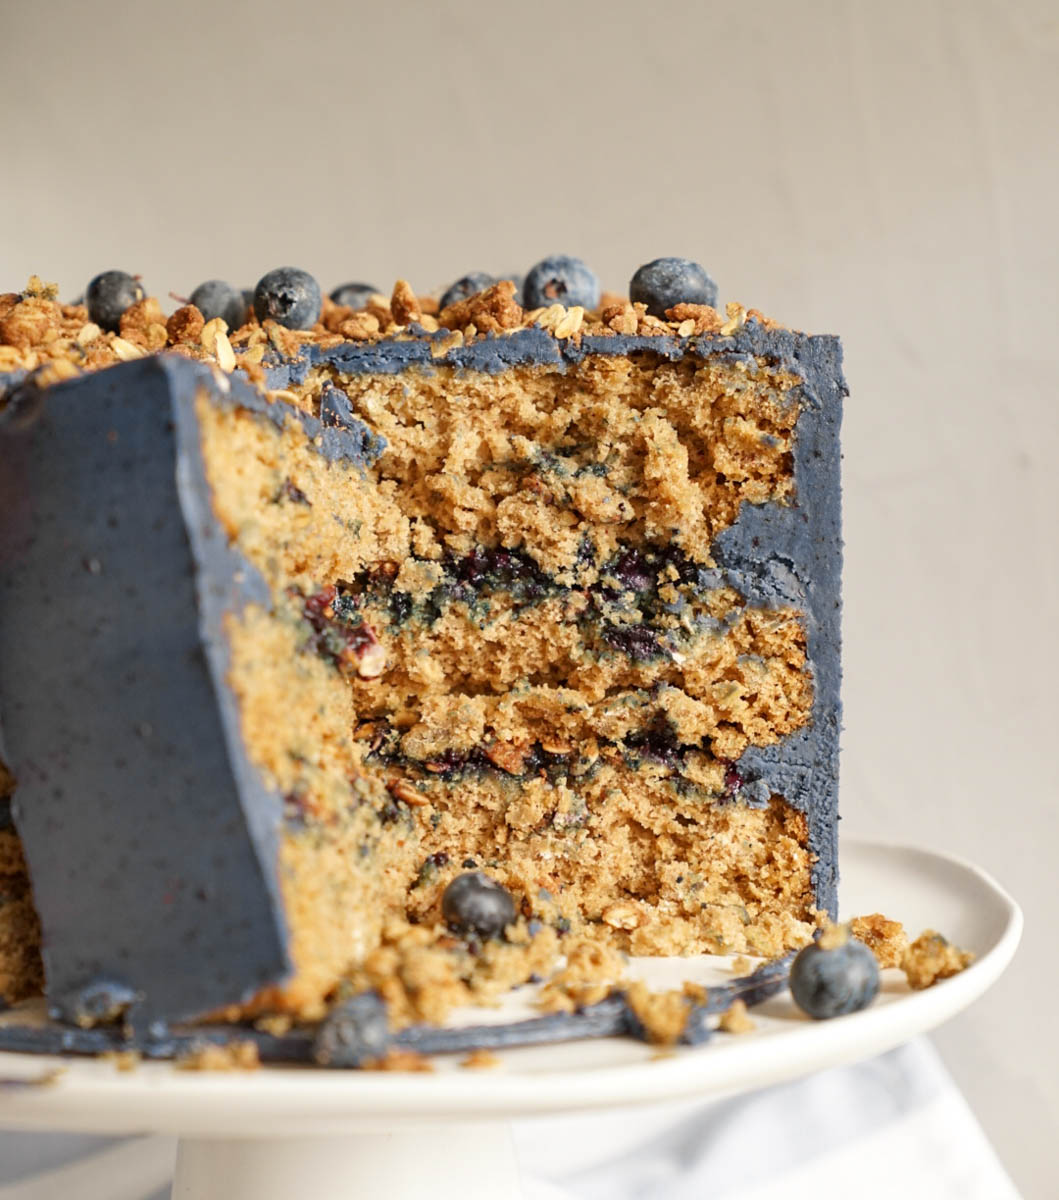
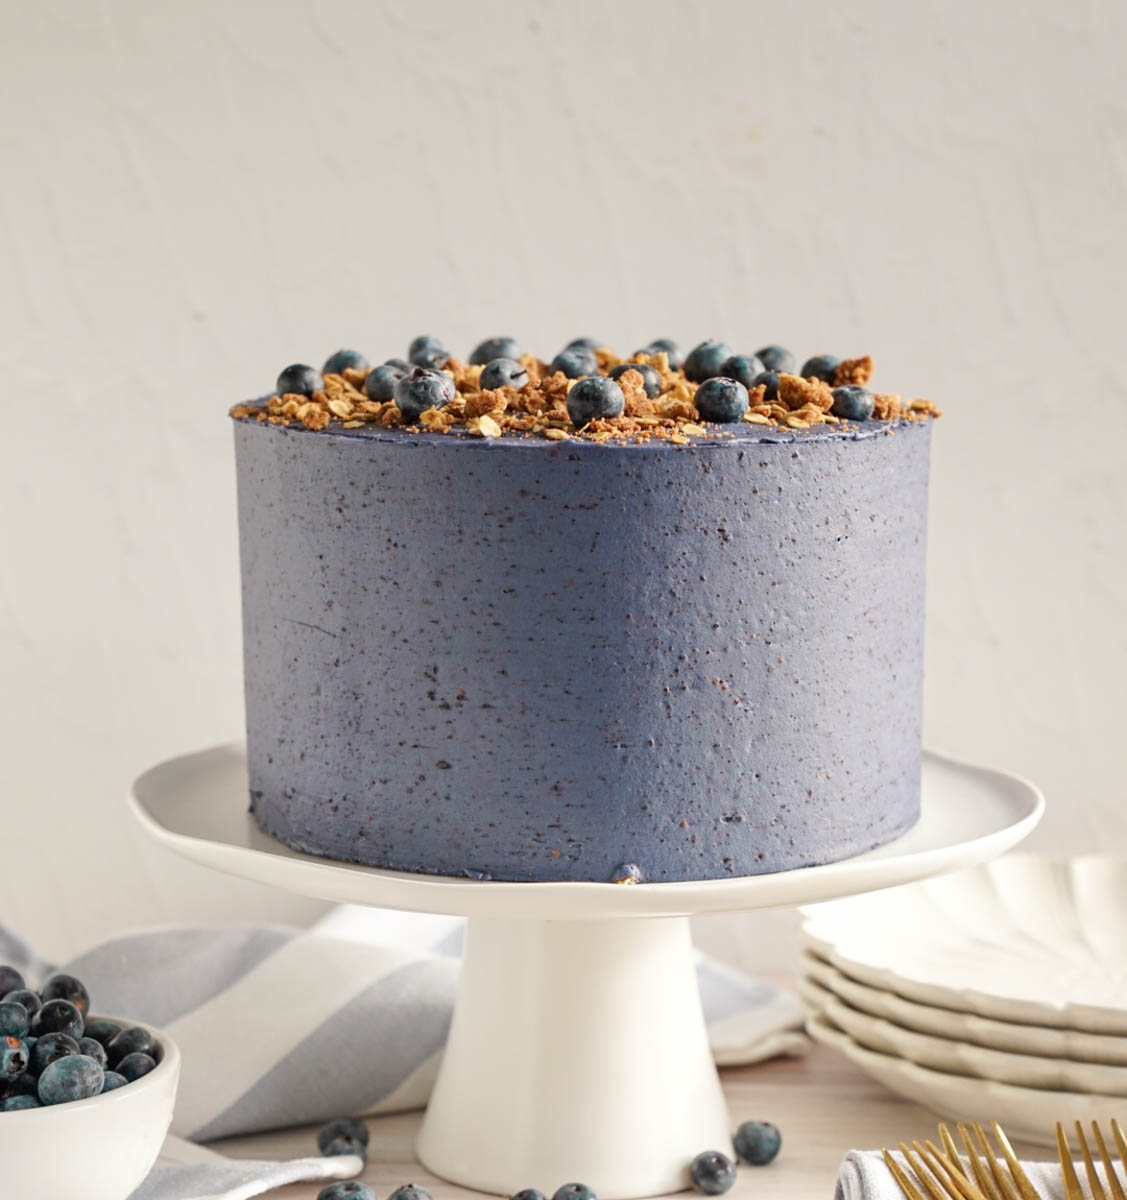
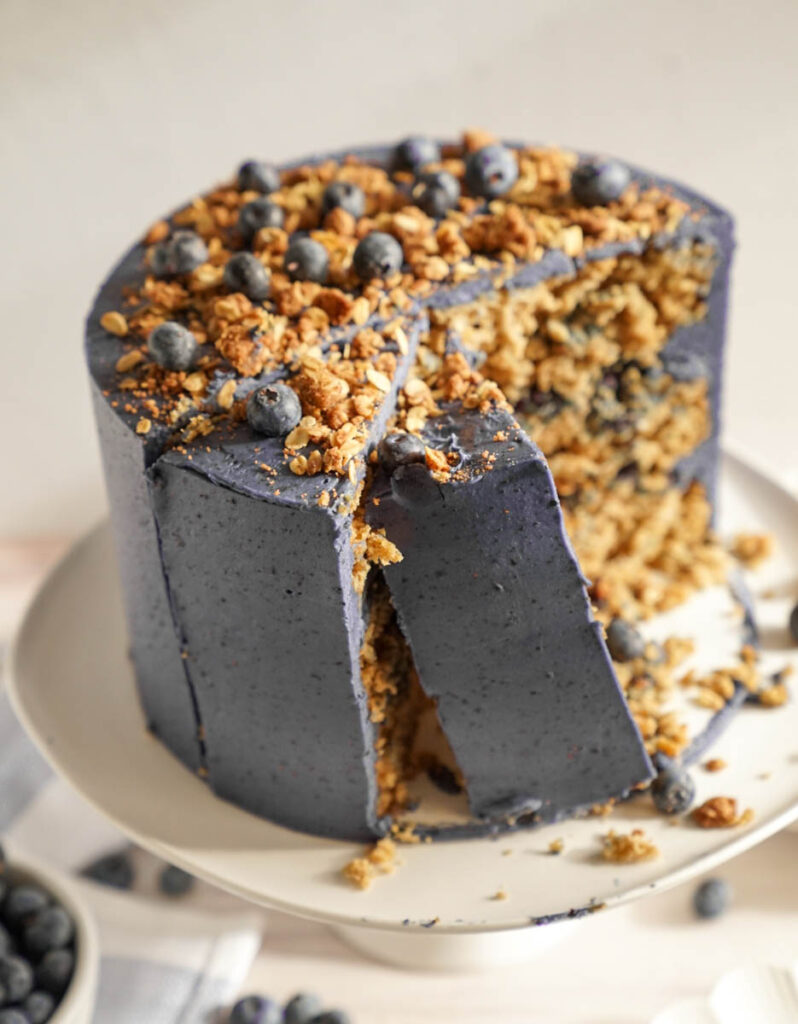
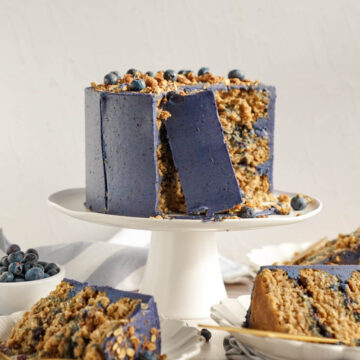
With summer inching its way towards us, I'm sure you're looking for the perfect summer dessert. My Blueberry Crisp Cake is just the desert you're looking for! With oatmeal layers, delicious blueberry compote filling, oatmeal crumble, and a blueberry buttercream frosting, it's like summer in every bite!
This Blueberry Crisp Cake is going to be your go to this summer. With blueberry season in full swing, run, don't walk, to your grocery store and pick up all the ingredients you will need for this cake. Once you give this one a try, I think it will be at the top of your summer dessert list, just like it is on mine!
For more summer desserts, I've listed some of my favorites here:
Brown Butter Blueberry Cookies, Lemon Blueberry Cake, Vanilla Berry Cake
Jump to:
Why this recipe works
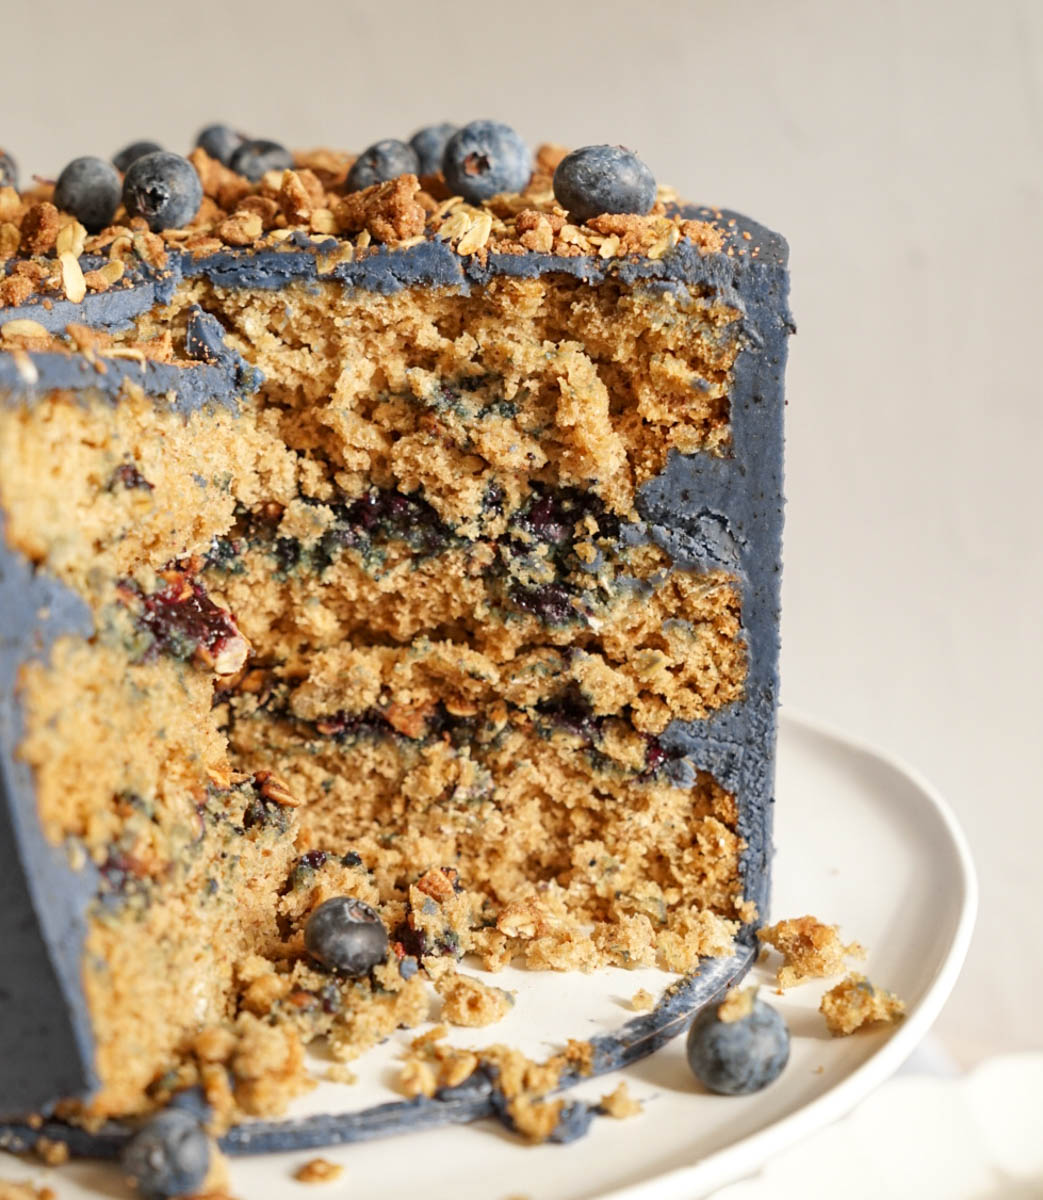
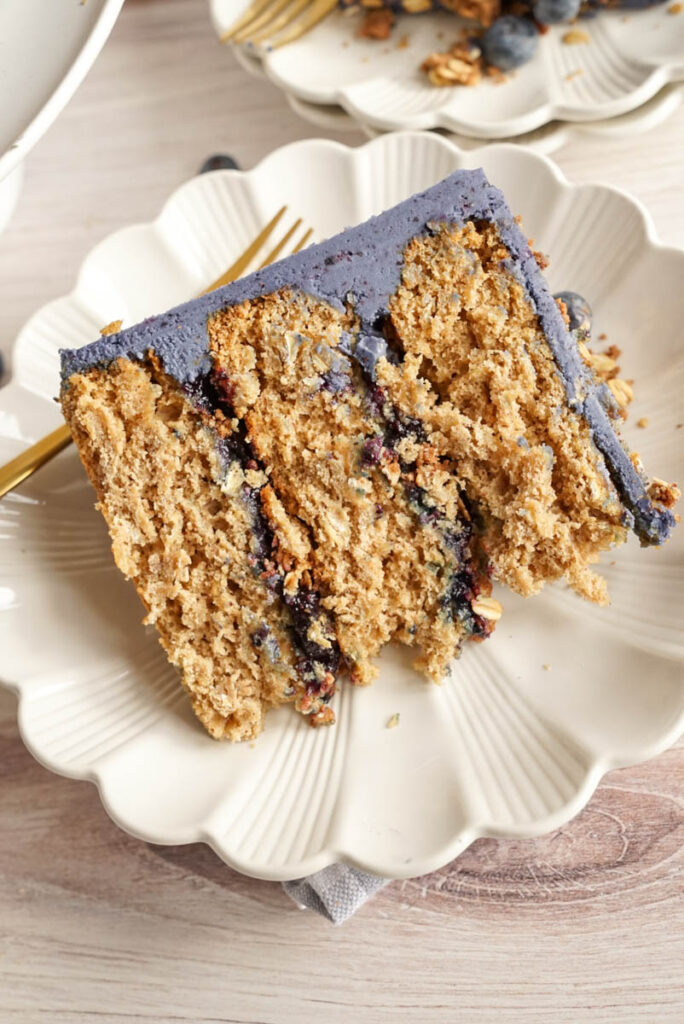
- Oatmeal cake layers- I use cooked old fashion oats (this is a must) to help make the cake soft and flavorful.
- Blueberry filling- Cooked blueberry filling made with fresh or frozen blueberries helps give this cake a perfect blueberry flavor.
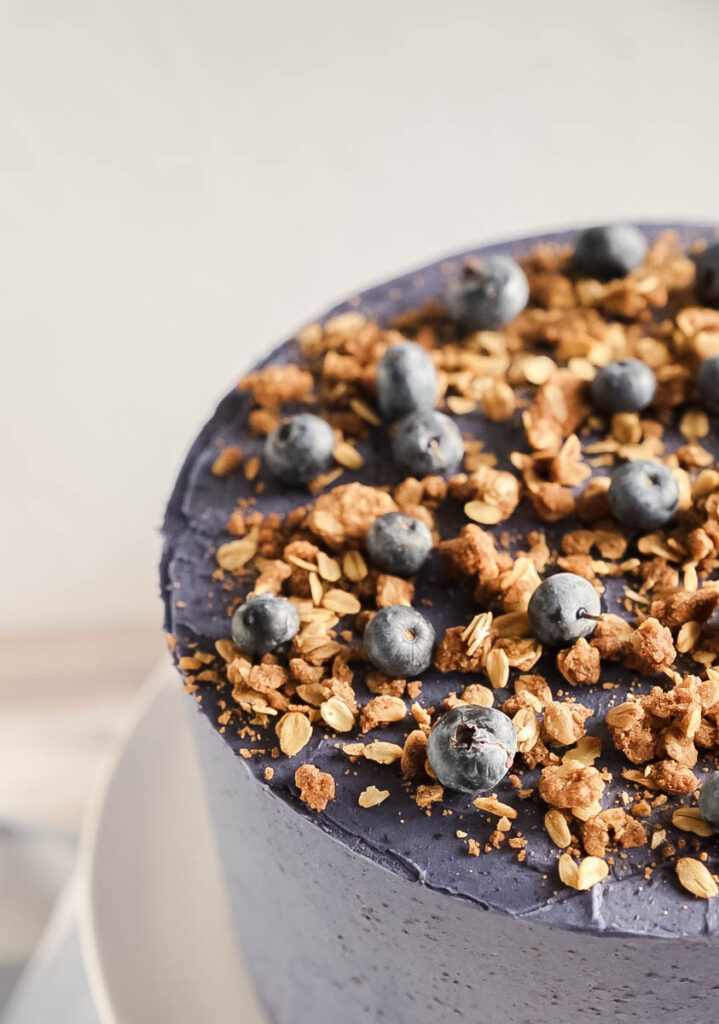
- Oat crumble- Just like a regular blueberry crisp, I use oats and my favorite ingredient (butter) to help give the cake a crunchy texture.
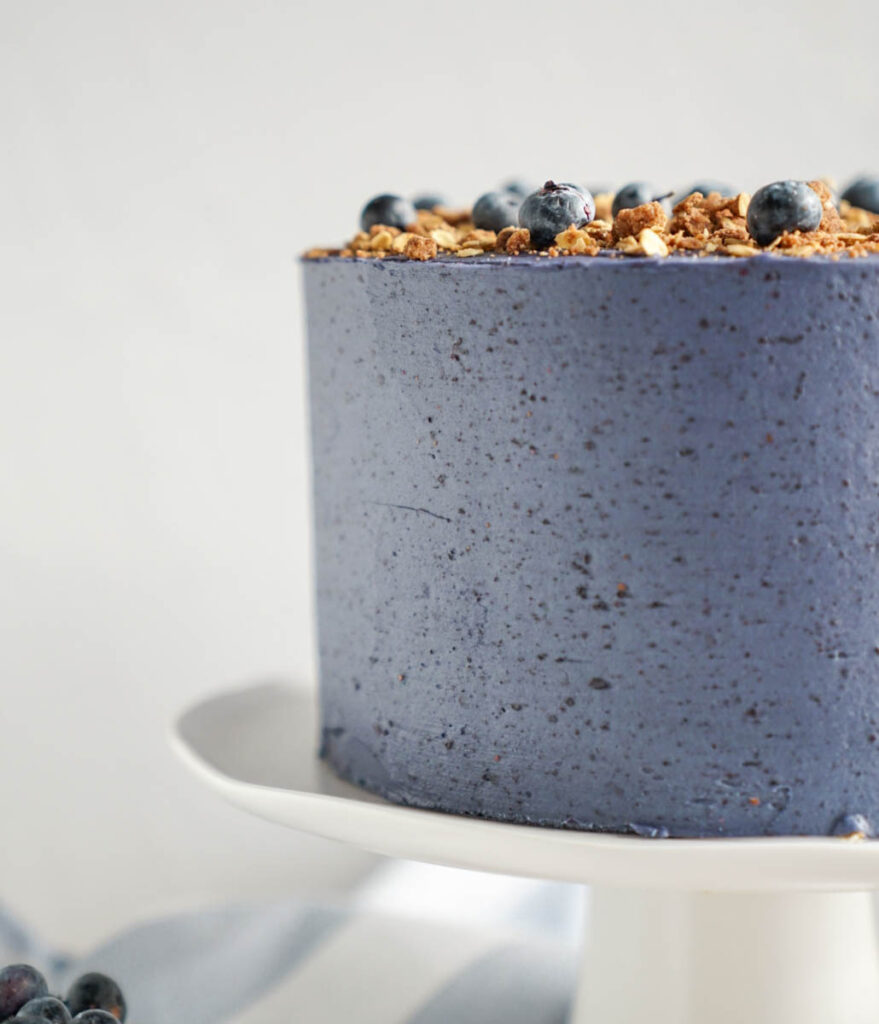
- Blueberry frosting- This frosting is made with a blueberry emulsion (which you can find here) and blended up freeze dried blueberries, which I got at target. Here is a link for them too.
- Layered cake- This is a three layer, 8 inch cake, but it can also be made into four layer, 6 inch cake, a whole sheet cake, or a 9x13 cake. For details on that, I have a whole section at the bottom of this page.
Ingredient list
Here are some of the ingredients that you might not have on hand, plus some detailed instructions of why I use certain ingredients. For the full list, please refer to my recipe card below.
- Unsalted butter- As always, I use unsalted butter to make sure my baked goods don't get too salty! For this cake, the butter needs to be pulled out 2-4 hours ahead of time to allow it to come to room temperature.
- Old fashion oats- It is important that you use old fashioned oats instead of steel cut or quick oats. The other cuts of oats just won't give you the same result that old fashioned will.
- Light brown sugar- Light brown sugar is always my sugar of choice.
- Eggs- I use large or extra large eggs. These need to pulled out 2-4 hours before making your cake layers.
- Cinnamon- I use ground cinnamon. In this recipe, you will use a lot of it!
- Blueberries- You can use fresh or frozen. Make sure you get enough to garnish the top too!
- Blueberry emulsion- My favorite brand is LorAnn's, you can find it here.
- Freeze dried blueberries- I always get mine at Target, but I have found some on Amazon, too!
Step by Step Instructions- for the cake
Step 1: Cook the oats. In a medium sized pot, start boiling the water. Once the water is boiling, add in 2 cups oats. Stir and remove the pot from the heat. With a lid, cover the pot and let the oats sit and absorb all of the water (about 15-20 minutes). Let it cool completely before you add the oats into your cake bater (about 20 minutes-these HAVE to be cool before you put them into the batter).
Step 2: Sift your dry ingredients together. Whisk the baking soda, salt, cinnamon, baking powder, and ½ cup of the oats and flour.
Step 3: Cream the butter and sugar. In the bowl of a stand mixer fitted with the paddle attachment, cream the butter and sugar together on medium speed until light and fluffy, about 2 minutes.
Step 4: Add the eggs and vanilla. Beating at medium speed, add the eggs, one at a time, scraping the bottom and sides of the bowl in between each addition and mix until combined. After all the eggs have been added, add the vanilla and beat on medium speed for 30 seconds.
Step 5: Add the cooled cooked oats. Add in the cooled cooked oats and the flour mixture, mixing on low until just combined.
Step 6: Divide and bake the batter. Evenly divide the batter into the prepared cake pans. I did mine in 8 inch pans (about 20 ounces of batter in each 8-inch pan). Bake for 28-32 minutes, or until the cake is set in the center and a toothpick comes out with just a few moist crumbs on it.
Step 7: Cool and level the cakes. Once the cakes have cooled completely, level them, if needed, so they are even and ready to frost.
Step by step- blueberry compote
Step 1: Cook the blueberries, sugar, and water. In a small sauce pan over medium heat, combine the blueberries, sugar and water. Stir until combined. Let it continue cooking until the blueberries start to open and it creates a sauce.
Step 2: Make the slurry. Make a slurry by combining the water and the cornstarch.
Step 3: Add the slurry. Making sure your blueberry compote is hot (it should have small bubbles forming), add the slurry. Stir until it starts to thicken (the heat helps to activate the corn starch). When you first add the slurry, it will be a light purple. Cook it until the color darkens. This means you are cooking out the flavor of the corn starch.
Step 4: Let it cool down. Set the compote aside and let it come to room temperature. As it cools down, it will thicken even more. Press plastic wrap on the top to help prevent a skin forming.
Step by Step- The crumble
Step 1: Preheat your oven. Preheat your oven to 375 degrees F. Line a baking sheet with parchment paper and set aside.
Step 2: Mix and cook. In a medium bowl, combine the oats, brown sugar, flour, butter, cinnamon and salt. Mix by hand with a wooden spoon until the mixture resembles clumps of sand. Spread the crumble over the parchment paper and bake for 8 to 10 minutes, stirring halfway through. The crumble should be golden brown.
Step 3: Break up the bigger pieces. Let it cool completely and then crumble the mixture into smaller pieces, if needed.

Step by step- the buttercream
Step 1: Beat the butter. In the bowl of a stand mixer fitted with a paddle attachment, soften the butter by creaming it for about 2 minutes.
Step 2: Add the powdered sugar. With the mixer on low speed, add the sifted powdered sugar.
Step 3: Add the blueberry flavorings. Add the freeze dried blueberries and the blueberry emulsion.
Step 4: Add the cream and salt. With the mixer on medium speed, add the whipping cream and salt.
Step 5: Beat the frosting. Turn the mixer to medium-high speed and beat for an additional 5 minutes. The frosting will become lighter in color and texture. With a rubber spatula, beat by hand to beat out any air pockets.
Cake assembly tips
- Use cold cake layers. Either have them frozen, or at least chilled.
- Pipe a small dollop of frosting onto the middle of a cake board to act as glue and hold the cake in place. Place the first cake layer, top side up, on the cake board.
- Pipe a rim of frosting around the edge of the cake layer. This will help support the cake layers and prevent the blueberry compote from spilling out. Spread about a half cup of the blueberry filling on the cake layer. Note: don't overfill with the blueberry compote. You can always serve extra on the side.
- Sprinkle about half of the crumble over the blueberry filling.
- Gently place the second cake layer on top of the filling and crumble and repeat the same process for the second cake layer, as you did for the first.
- Place the final cake layer top side down on the second layer of filling.
- Apply a small amount of frosting to the cake to act as a crumb coat around the entire cake. Freeze the cake for 10 minutes to set the crumb coat.
- After the crumbs are locked in, continue to frost and decorate the cake with the rest of the buttercream.
Expert baking tips
-Make sure that your ingredients for the cake are at room temperature. This will help your cakes rise properly in the oven.
-You can make everything ahead of time and assemble it on the day that you are ready to serve it.
-SIFT your powdered sugar. This is a step you seriously don't want to miss out on. It helps keep your buttercream smooth and SILKY.
-Use high quality cake pans. My favorite trusted brand is FAT DADDIOS. You can find them here!
-I use a little food gel to get a true blueberry color. This is totally optional, but my favorite brand is amerigel, I like to use a gel base food coloring instead of a water based color.

FAQ
Can I make this into a sheet cake?
Yes this can be turned into a sheet cake, four 6 inch layer cakes, or a 9x13 (if you do a 9x13, it will need to bake for 40-45 minutes.)
Can these be made into cupcakes?
YES! You just need to reduce the baking time to 23-27 minutes.
What if I can't find emulsion?
I have found emulsion at Micheal's, Amazon, and Hobby Lobby. If you can't find it anywhere, you can leave it out and just use a little more freeze dried blueberry.
Storing and freezing
If I am dividing my Blueberry Crisp Cake making into multiple days, I bake my cake layers, cool them, and wrap them with plastic wrap and store them in the fridge or the freezer. This helps reduce crumbs and makes it so the layers don't slide around when decorating. They can be stored in the fridge for 3-5 days.
Freezing
If you want to make the entire cake ahead of time, you can freeze the decorated cake by simply chilling it and then wrapping it with plastic wrap. If you want to store it for longer than a few days, put a layer of aluminum foil over the plastic wrap. It can be stored like this in the freezer for up to 6 months. Once you are ready to serve the cake, pull it out of the freezer and place it in the fridge to thaw (this will help decrease condensation).
Here are more recipes you are going to want to try:
Strawberry Lime Cake, Orange Creamsicle Cake, Peanut Butter Jelly Cake
Recipe
Blueberry Crisp Cake
Ingredients
FOR THE CAKE
- 2 ½ cups water
- 2 cups uncooked old-fashioned oats
- 1 cup unsalted butter room temperature
- 1 ¾ cups light brown sugar packed
- 2 teaspoons pure vanilla
- 4 eggs room temperature
- 1 teaspoon kosher salt
- 1 teaspoon baking powder
- 2 teaspoons baking soda
- 2 teaspoons cinnamon
- 3 cups all purpose flour
- ½ cup uncooked old fashioned oats
For the Blueberry Compote
- 2 Tablespoons water
- 1 cup blueberries fresh or frozen
- ½ cup granulated sugar
- 1 Tablespoon Cornstarch
- ⅓ cup water for the slurry
For the Crumble
- ¾ cup old fashioned oats
- ¼ cup light brown sugar packed
- ¼ cup all-purpose flour
- 3 Tablespoons unsalted butter cold and cut into cubes
- ½ teaspoon ground cinnamon
- Pinch of salt
For the blueberry buttercream
- 2 cups unsalted butter slightly chilled
- 5 cups powdered sugar measured and then sifted
- ¼ cup freeze dried blueberries pulverized and then measured
- ⅓ cup heavy whipping cream
- 2 teaspoons blueberry emulsion
- Amerigel Blue optional
- Pinch of salt
Instructions
For the cake
- Preheat your oven to 325 degrees F. Spray three 8-inch or four 6-inch round cake pans with cooking spray. Spray the bottom of the pans, line the bottoms with parchment paper, and spray again. Set aside.
- In a medium sized pot, start boiling the water. Once the water is boiling, add in 2 cups oats, stir and remove the pot from the heat. With a lid, cover the pot and let the oats absorb all of the water. (about 15-20 minutes). Let it cool completely (about 20 minutes) before you add it into the cake bater.
- In a medium sized bowl, whisk the baking soda, salt, cinnamon, baking powder, ½ cup of oats, and flour. Set aside.
- In the bowl of a stand mixer fitted with the paddle attachment, cream the butter and sugar together on medium speed until light and fluffy. About 2 minutes.
- With the mixer at medium speed, add the eggs, one at a time, scraping the bottom and sides of the bowl in between each addition and mix until combined. After all the eggs have been added, add the vanilla and beat on medium speed for 30 seconds.
- Turn the mixer off, add in the cooled cooked oats and the flour mixture, mixing on low just until combined.
- Evenly divide the batter into the prepared cake pans, (about 20 ounces of batter in each 8-inch pan ) and with the back of a spoon or a small offset spatula, evenly distribute the batter to the sides of the pan and bake for 28-32 minutes or until the cake is set in the center and a toothpick comes out with just a few moist crumbs on it.
- Allow the cake to cool in the pans for about 10-15 minutes and then transfer them out of the cake pans and onto wire racks to cool completely.
- Let the cake come to room temperature and if the cakes need to be leveled, level them before wrapping and storing.
- If you're not using the cake layers right away, wrap each layer in plastic wrap.
For the Blueberry Compote
- In a small sauce pan over medium heat, combine the blueberries, sugar and water. Stir until combined. Let it continue cooking until the blueberries start to open and it creates a sauce.
- Make a slurry by combining the water and the cornstarch. Making sure your blueberry compote is hot, add the slurry (the heat helps activate the corn starch). Stir until it starts to thicken. When you first add the slurry, it will be a light purple. Cook it until it darkens. This means you are cooking out the flavor of the corn starch.
- Set aside and let it come to room temperature. As it cools down, it will thicken even more. Press plastic wrap on the top to help prevent a skin from forming.
- (You can put it in the fridge, if you desire, to help the cool down process go faster)
For the crumble
- Preheat your oven to 375 degrees F. Line a baking sheet with parchment paper and set aside.
- In a medium bowl, combine the oats, brown sugar, flour, butter, cinnamon and salt. Mix by hand with a wooden spoon until the mixture resembles clumps of sand. Spread the crumble over the parchment paper and bake for 8 to 10 minutes, stirring halfway through. The crumble should be golden brown. Let it cool completely and then crumble the mixture into smaller pieces, if needed.
For the blueberry buttercream
- In the bowl of a stand mixer fitted with a paddle attachment, soften the butter by creaming it for about 2 minutes.
- With the mixer on low speed, add the sifted powdered sugar.
- Add the freeze dried blueberries and blueberry emulsion.
- With the mixer on medium speed, add the whipping cream and salt.
- Turn the mixer to medium-high speed and beat for an additional 5 minutes. The frosting will become lighter in color and texture. With a rubber spatula, beat by hand to beat out any air pockets.
Assembly
- Pipe a small dollop of frosting onto the middle of a cake board to act as glue and hold the cake into place. Place the first cake layer, top side up, on the cake board
- Pipe a rim of frosting around the edge of the cake layer. This will help support the cake layers and prevent the blueberry filling from spilling out. Spread about a half cup of the blueberry filling on the cake layer. Note: don't overfill with the blueberry compote. You can always serve extra on the side.
- Sprinkle about half of the crumble over the blueberry filling.
- Gently place the second cake layer on top of the filling/crumble and repeat the same process for the second cake layer.
- Place the final cake layer top side down on the second layer of filling.
- Apply a small amount of frosting to the cake to act as a crumb coat around the entire cake. Freeze the cake for 10 minutes to set the crumb coat.
- After the crumbs are locked in, continue to frost and decorate the cake with the rest of the buttercream.
Savanah says
Could lemon be added somewhere? Lemon and blueberry are so good together!
Molly Murphy says
Hi, Savanah! I do have a lemon blueberry cake! here is the link https://www.cake-babe.com/delightful-lemon-blueberry-cake/ I'm not sure if lemon and oats would go together, if you try something with it please let me know what/how you did it and I would love to hear the details!!!!