
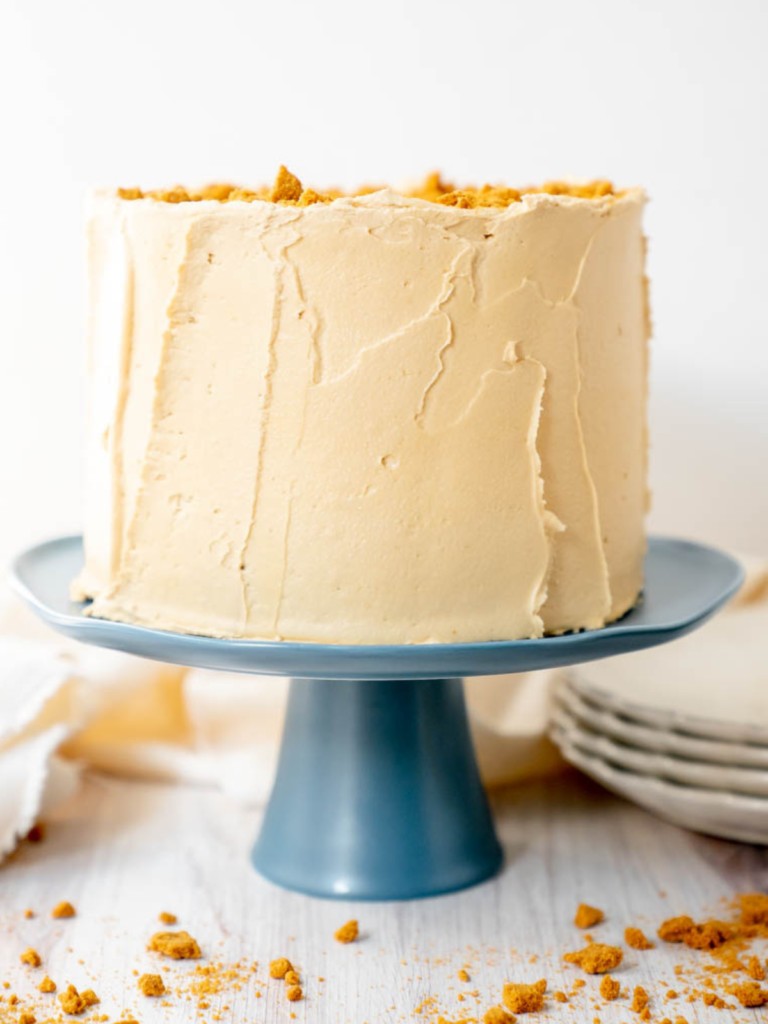
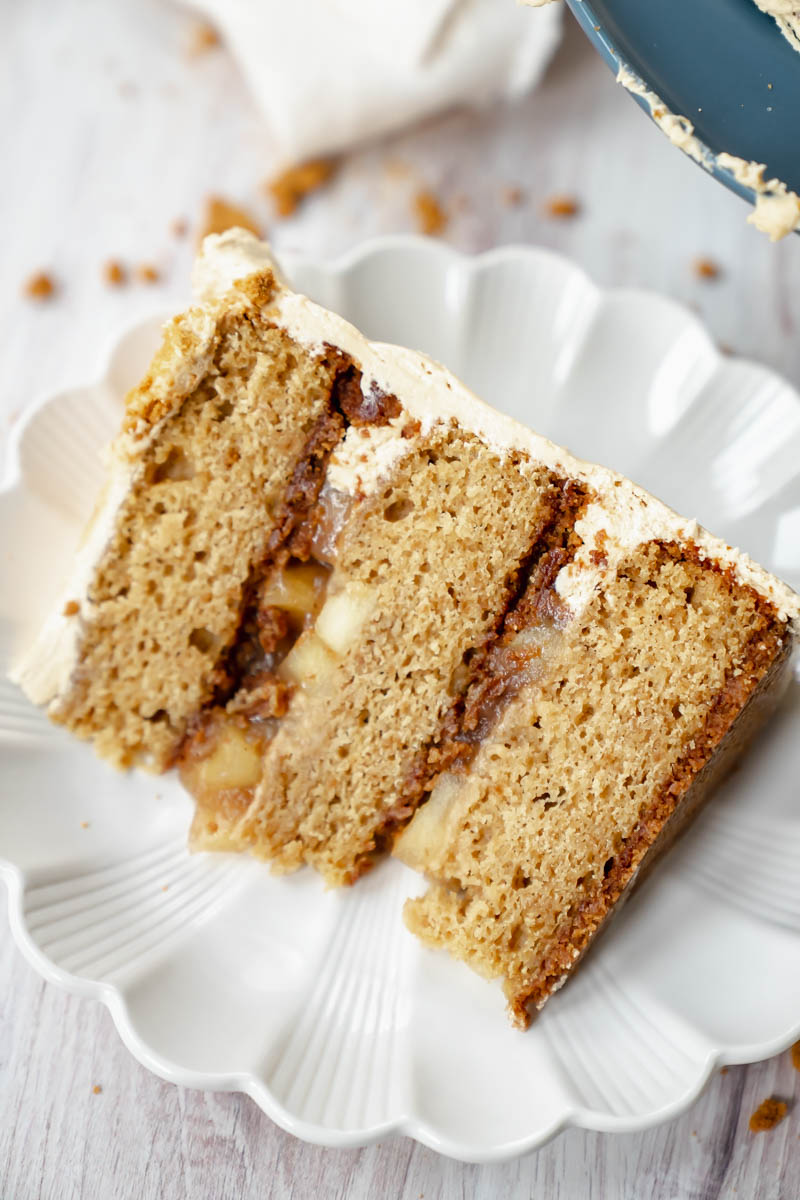
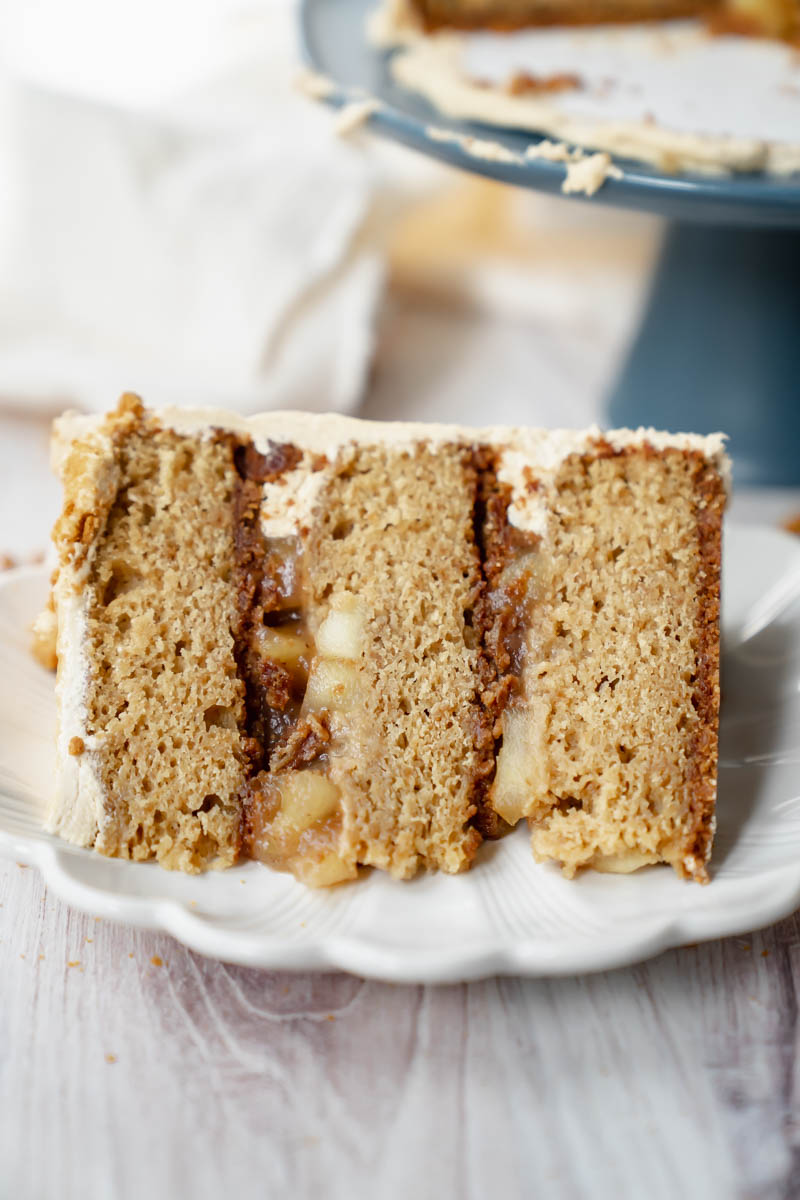
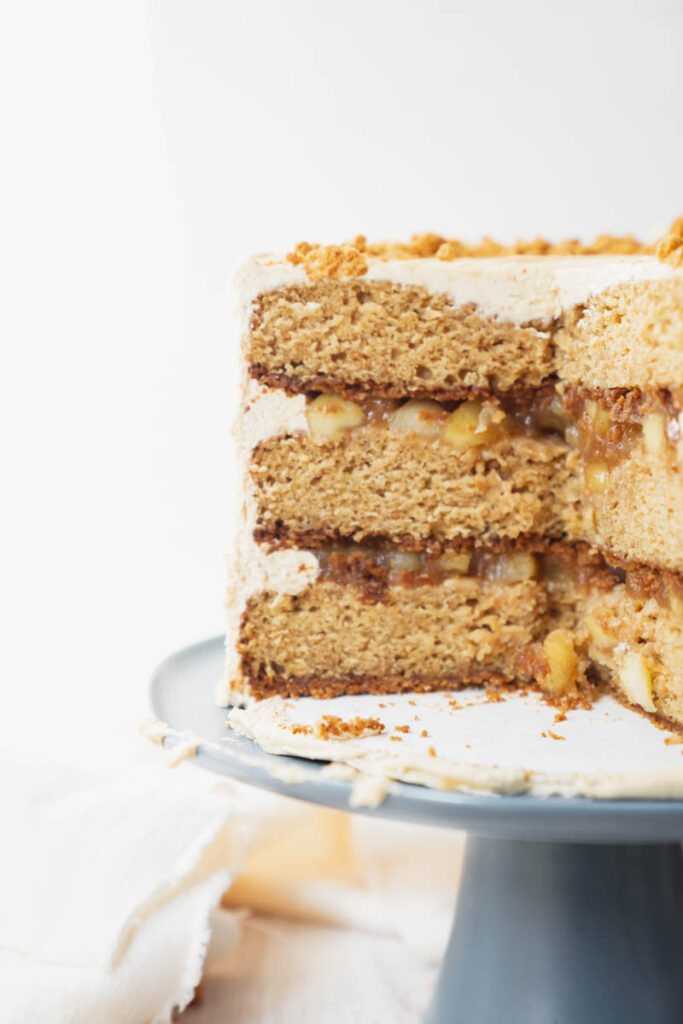
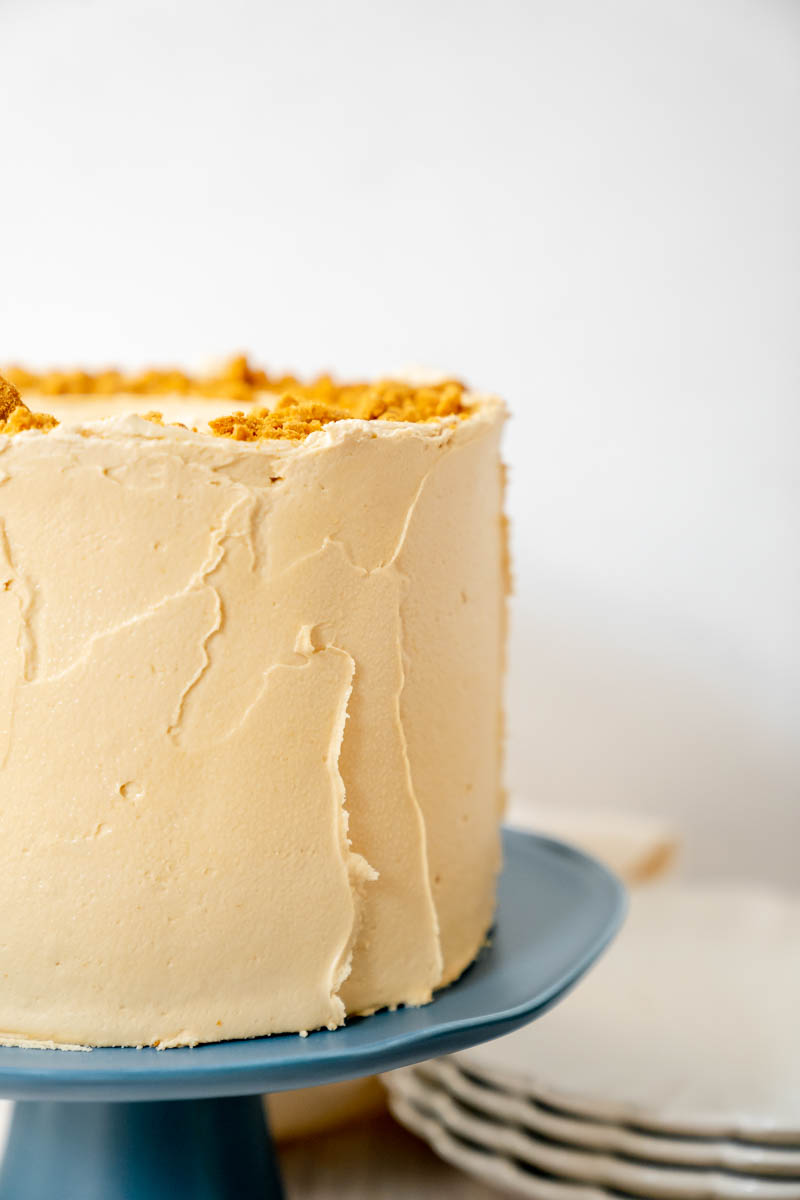
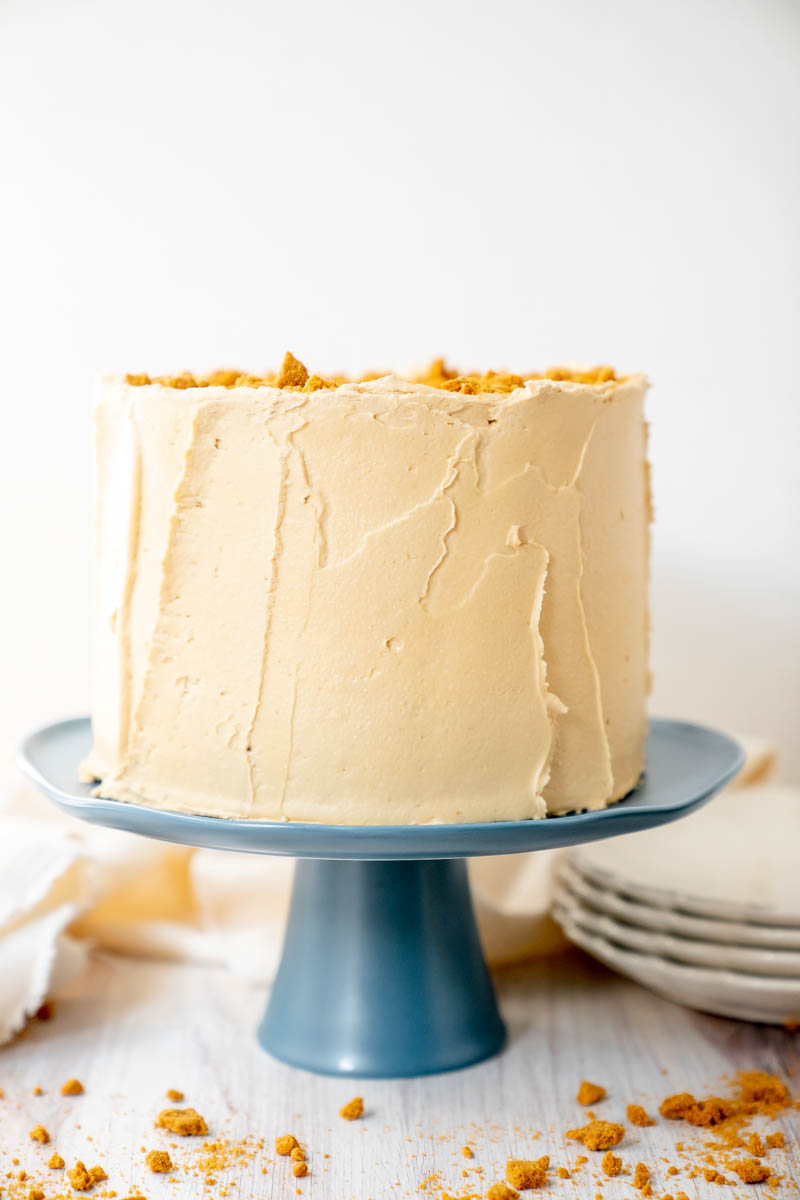
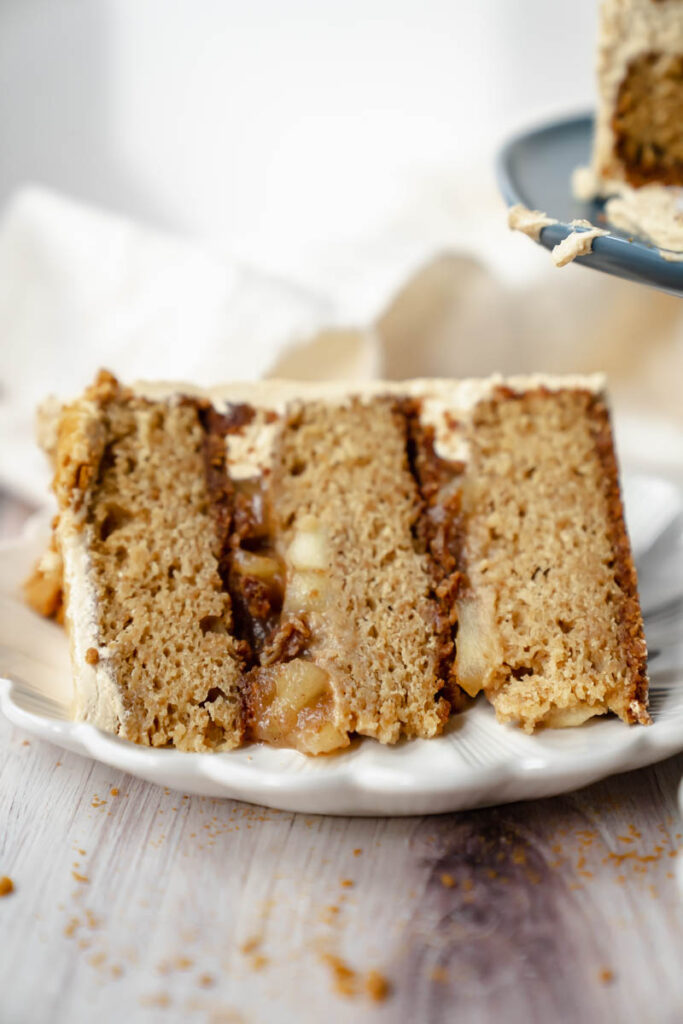
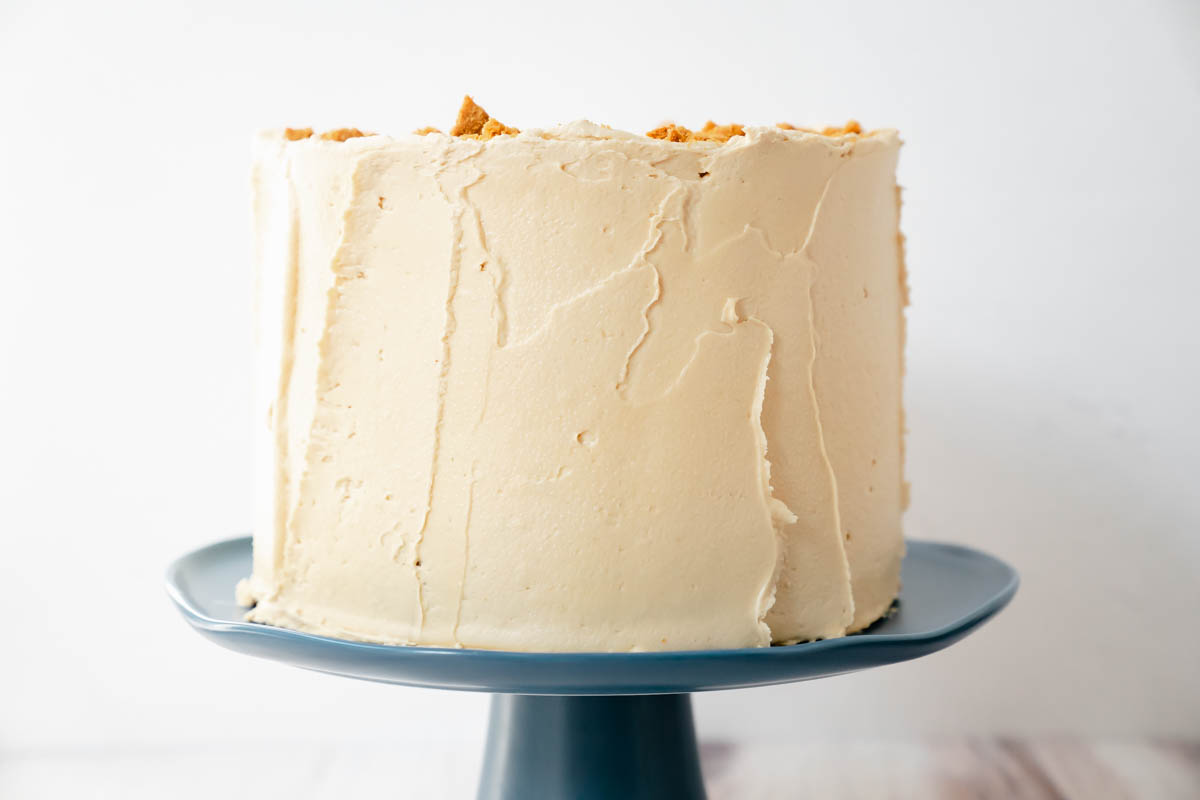
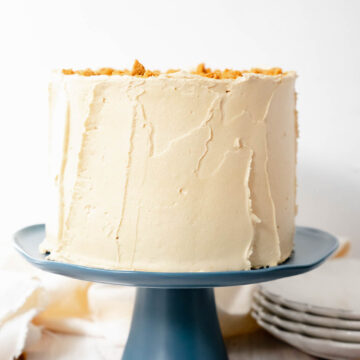
Biscoff Apple Cake- fresh layers of Lotus Biscoff cake layers with a buttery apple filling covered in a cookie butter spread buttercream
Apple and Biscoff are a match made in heaven. This Biscoff Apple Cake is the epitome of fall. When I think of fall, I always think of the harvest, especially all of the apples that we would make applesauce and apple pie out of as a kid. As I have gotten older, I have started to associate the flavor of Biscoff with fall. So this cake represents the intersection between my memories of fall with how I experience fall now. In other words, I AM SO EXCITED FOR YOU ALL TO TRY THIS CAKE
If you want other fall recipes, I'll list my top ones below
- The Most Delicious Pumpkin Coffee Cake Cookies
- The Best Ever Chocolate Salted Caramel Cake
- The Greatest Pumpkin Snickerdoodle Cake
- Pumpkin Biscoff Cake
Jump to:
Why you'll love this recipe
- Biscoff cookie crust-It is made with Biscoff cookies, butter, and sugar. This cookie crust gives the cake a deliciously crunchy texture.
- Tender Biscoff layers-I put ground up Biscoff cookies right into the cake layers to give them that delicious Biscoff taste.
- Cookie butter Buttercream-This creamy cookie butter buttercream is made with cookie butter spread, powdered sugar, cream, and butter. Don't be surprised if you end up licking the bowl clean on this one.
- Apple Filling- finely diced pink lady and granny smith apples. I decided to go with two different kinds to really help build the apple flavor. I added just a hint of cinnamon to bring everything together.
- Layered cake-This is a three layer 8-inch cake, but if you have 4, 6-inch pans, that will also work.
- The perfect dessert for any occasion- This cake was made to eat on a nice fall evening with your friends or your family, but let's be honest: it is just as good eating alone in the middle of a July night.
Ingredients you will need
Here are some ingredients that you will need for this recipe that you may not have on hand. For a complete list of ingredients, check out the recipe card below.
- Biscoff cookies-I like to use Lotus brand Biscoff cookies, but if you find another brand, like Speculoos, you can totally use that too.
- Unsalted butter-This recipe uses a lot of butter. In fact, each element of this cake has butter in it. For the cake layers, make sure to pull the butter out of the fridge so it is at room temperature when you begin making the cake. This is so important!!
- Large eggs-The eggs need to be pulled out 2-4 hours before you make your cake batter.
- Cookie Butter spread-I like to use Lotus, but Walmart and Trader Joe's both have brands that are great too!
- Buttermilk-This recipe uses a lot more buttermilk than most of my other recipes. Make sure to pull it out at least 2 hours before you start baking the cake batter.
- Powdered sugar-You need to sift the powdered sugar when you make your vanilla buttercream. It will your cake so much smoother.
- Apples- I used two kinds of apples to give it a balance of sweet and tart. I used Granny Smith and Pink Lady!
Step by step instructions: Cake
STEP 1: Beat the butter, sugar, and oil. Beat these ingredients on high for 5 minutes to get a light and fluffy texture. This creates air pockets in your cake that also help it rise. I recommend beating them for 2 minutes, then scraping down the sides, and beating for the remaining 3 minutes.
STEP 2: Beat the eggs. Beating the eggs after each addition is considered the "creaming method." You'll want to scrape down the bowl after each egg to really ensure that they are creamed into the butter and sugar.
STEP 3: Add the vanilla extract. After adding the eggs, add the vanilla extract.
Step 4: Add in the dry ingredients and buttermilk. Alternate these and mix on low.
Step 6: Bake the cake. Bake the cake layers low and slow for 36-41 minutes, depending on your oven. Mine took 39 minutes
Step by step: Apple Filling
Step 1: Combine the ingredients . In a large bowl, combined all ingredients except the corn starch and water. Toss until evenly combined.
Step 2: Cook the apple mixture. Place the apples mixture in a medium-large pot over medium-high heat. Slowly bring to it to boil over, using a rubber spatula to stir. Make your slurry by add cold water to the corn starch. Set aside
Step 3: Make and add the corn starch slurry. As the apples begin cook they release liquid. Once apple have slightly cook and look slightly soften, add the slurry to the mixture stirring constantly. It should start to thicken after about 30 seconds. If it hasn't, make a little more slurry.
Step 4: Store. Once done, remove the apple and transfer to a container and put in the fridge to cool down. Once completely cooled, the filling can be stored in the fridge in an airtight container for up to 1 week.
Step by step: Buttercream
Step 1: Cream the butter. In the bowl of electric mixer fitted with the paddle attachment, combine the butter and cookie butter spread. Beat on medium-high speed until smooth, about 45 seconds.
Step 2: Add powder sugar, vanilla and heavy cream. Add the powdered sugar to the bowl and mix in, slowly at first until incorporated, then increasing the mixer speed to high. Blend in the vanilla extract, salt and heavy whipping cream, and continue to whip on high speed until very fluffy, about 4-5 minutes, scraping down the sides of the bowl as needed.
Step 3: remove the air bubbles. Beat frosting by hand with a wooden spoon to get air bubbles out.
Assembly
Here are some of my favorite cake decorating equipment that will be helpful while decorating
Turn table, offset spatula, cake scraper, cake leveler.
- Level cakes, if needed. Smear a dollop of frosting in the middle of the cake board to act as a glue. Place the first cake layer on a cake board, with the Biscoff crust layer on the bottom.
- Pipe a rim of frosting around the edge of the cake to create a barrier for the filling.
- Add ½ cup of the apple filling to the top of the cake layer, evenly spread it across the cake.
- Repeat with the second layer of cake.
- Place your final cake layer, with the Biscoff crust on the bottom, right on top of the second layer of filling.
- Apply a thin layer of the cookie butter buttercream around the entire cake and freeze the cake for 10 to 15 minutes.
- Once the crumb coat is set, finish frosting and decorating the cake with the remaining buttercream. Garnish with Biscoff cookie crumbs.
Expert baking tips
- Use high quality cake pans. This helps prevent your cake layers from browning on the sides. I always use Fat Daddios cake pans. You can find the ones I use here:
- I say this a lot because I think it's really important… USE ROOM TEMP ingredients! Making sure all of your ingredients are the same temp is a must!
- To get a creamy and smooth buttercream, add a Tablespoon of whipping cream once you finish mixing the buttercream. Then beat by hand with a rubber spatula to get all the air bubbles out.
- Do a crumb coat. Don't skip this step. It helps secure the crumbs onto the cake and makes decorating easier.
FAQ
Can I make this into a sheet cake?
Yes, this can be turned into a sheet cake, four 6-inch cake layers, or a 9×13 (if you do a 9×13, it will need to bake for 40-45 minutes).
Can these be made into cupcakes?
YES! You just need to reduce the baking time to 23-27 minutes.
Can I make this ahead of time?
I highly suggest making each element ahead of time and then decorating the next day.
Storing and freezing
Store this Biscoff Apple Cake in an airtight container or wrap in plastic wrap. I would leave uneaten portions in the fridge and then bring it to room temperature before serving.
Freezing
Because of the apple filling, I do not recommend freezing the cake as it can become fermented.
If you love this recipe, please remember to rate and review it!
For more Biscoff related recipes, you can find them below;
- Ultimate Biscoff Cake
- The Most Scrumptious Biscoff Fudge Cake
- Banana Biscoff Cake
- Biscoff Banana Bread
- Pumpkin Biscoff Cake
Recipe
Biscoff Apple Cake
Ingredients
For the Biscoff crust
- 32 Biscoff cookies pulverized to a fine crumb
- ½ cup unsalted butter melted
- ⅓ cup granulated sugar
For the Biscoff cake layers
- 22 Biscoff Cookies pulverized to a fine crumb
- 2 ¼ cups all-purpose flour
- 2 teaspoons baking powder
- 1 teaspoon baking soda
- 1 teaspoon salt
- 1 cup unsalted butter room temperature
- 1 ⅔ cups light brown sugar packed
- ¼ cup vegetable oil
- 4 large or extra large eggs at room temperature
- 1 teaspoon vanilla
- 2 cups buttermilk at room temperature
FOR THE APPLE FILLING
- 6 large apples peeled and small diced I used 3 Granny Smith and 3 Pink Lady apple
- 3 tablespoons lemon juice
- 1 cup granulated sugar
- 1 ½ teaspoon ground cinnamon
- pinch of salt
- ¼ cup corn starch
- ½ cup cold water
For the Buttercream
- 5 cups powdered sugar sifted
- 1 ½ cups unsalted butter slightly chilled
- 1 cup cookie butter spread
- 1 teaspoon purevanilla extract
- 3 tablespoons heavy whipping cream
- Pinch of salt
Instructions
For the crust
- Preheat the oven to 325 degrees F. Using 3, 8-inch cake pans, spray the bottom of the cake pan with cooking spray, line with parchment paper, and spray again. Set aside.
- In a blender, pulverize the Biscoff cookies to resemble a fine crumb.
- In a medium-sized bowl, whisk the melted butter, sugar, and pulverized Biscoff cookies until they are evenly combined. You should be able to grab the mixture by hand it have it stick together.
- Pour about ¾ cup of the mixture into each prepped cake pan. With a flat surface, firmly and evenly press the Biscoff mixture into each pan, making sure to get it in the corners too. Bake for 8 minutes. Let them cool for 10 minutes before putting the batter into them.
- While the layers are baking, start making the Biscoff cake batter.
For the Biscoff cake
- Place the Biscoff cookies in a blender and blend until the cookies are finely ground into a fine crumb.
- In a medium-sized bowl, whisk together the Biscoff crumbs, all-purpose flour, baking powder, baking soda, and salt until evenly combined.
- In the bowl of a stand mixer fitted the paddle attachment, cream the butter, brown sugar, and oil on medium speed until light and fluffy, about 5 minutes. The mixture will start looking light in color.
- Add the eggs, one at a time, beating on medium speed for 30 second after each addition. Add the vanilla and mix on the lowest speed, just until combined.
- With the mixer on the lowest speed, add ⅓ of the dry ingredients and half of the buttermilk. Mix just until combined. Repeat this step. Add the rest of the flour mixture and continue to mix on the lowest speed until the flour and the buttermilk have all been incorporated. With a rubber spatula scrape down the sides and bottom of the bowl and slowly mix by hand.
- Divide the batter evenly among your pans, (about 20 ounces in each pan) and bake for about 35-39 minutes. To check, insert a toothpick. Once little to no crumbs come out on your toothpick, the cakes are done. (my oven runs a little cooler than most, so mine took 39 minutes) Because of the cookies and the brown sugar in this recipe, the cake layers will brown on top. That is normal and what you want.
- After they are out of the oven, I let mine cool for 15 minutes. Then I transfer them onto a wire rack to finish cooling. Let them come to room temperature before wrapping them in plastic wrap and freezing or refrigerating.
For the apple filling
- In a large bowl, combined all ingredients except the corn starch and water. Toss until evenly combined.
- Place the apples mixture in a medium-large pot over medium-high heat. Slowly bring to it to boil over, using a rubber spatula to stir. Make your slurry by add cold water to the corn starch. Set aside
- As the apples begin cook they release liquid. Once apple have slightly cook and look slightly soften, Add the slurry to the mixture stirring constantly. It should start to thicken after about 30 seconds. If it hasn't, make a little more slurry.
- Once done, remove the apple and transfer to a container and put in the fridge to cool down. Once completely cooled, the filling can be stored in the fridge in an airtight container for up to 1 week.
For the Buttercream
- In the bowl of electric mixer fitted with the paddle attachment, combine the butter and cookie butter spread. Beat on medium-high speed until smooth, about 45 seconds.
- Add the powdered sugar to the bowl and mix in, slowly at first until incorporated, then increasing the mixer speed to high. Blend in the vanilla extract, salt and heavy whipping cream, and continue to whip on high speed until very fluffy, about 4-5 minutes, scraping down the sides of the bowl as needed.
- Beat frosting by hand with a wooden spoon to get air bubbles out.
Assembly
- Smear a dollop of frosting in the middle of the cake board to act as a glue. Place the first cake layer on a cake board, with the Biscoff crust layer on the bottom.
- Pipe a rim of frosting around the edge of the cake to create a barrier for the filling.
- Add ½ cup of the apple filling to the top of the cake layer, evenly spread it across the cake.
- Repeat with the second layer of cake.
- Place your final cake layer, with the Biscoff crust on the bottom, right on top of the second layer of filling.
- Apply a thin layer of the cookie butter buttercream around the entire cake and freeze the cake for 10 to 15 minutes.
- Once the crumb coat is set, finish frosting and decorating the cake with the remaining buttercream. Garnish with Biscoff cookie crumbs.
Leave a Reply