
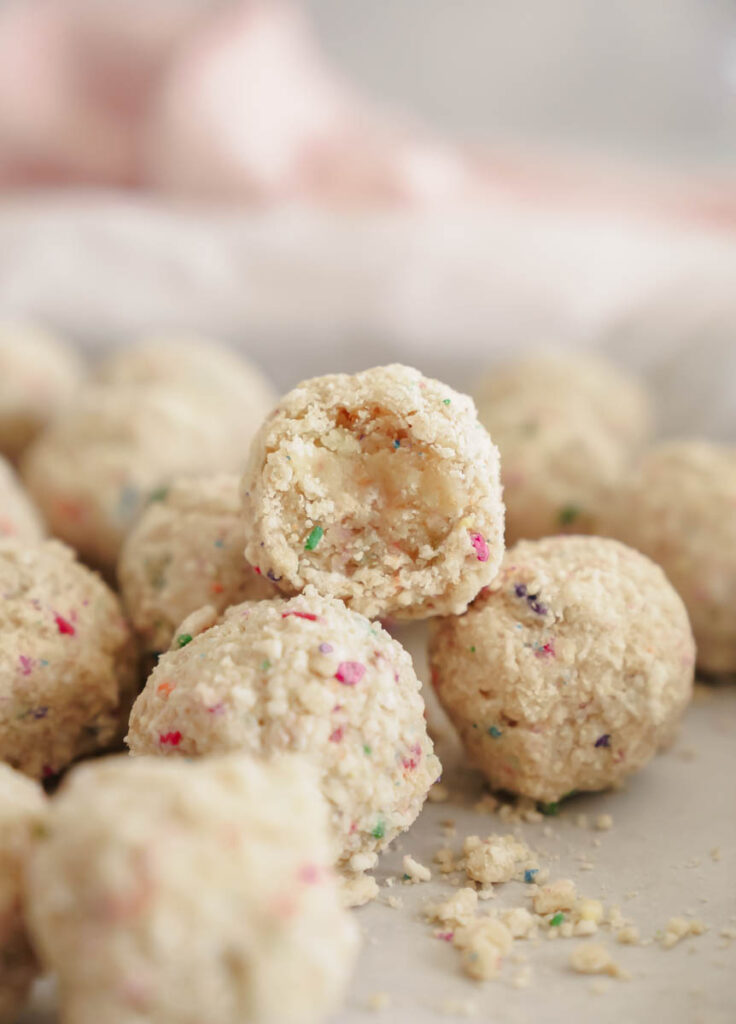
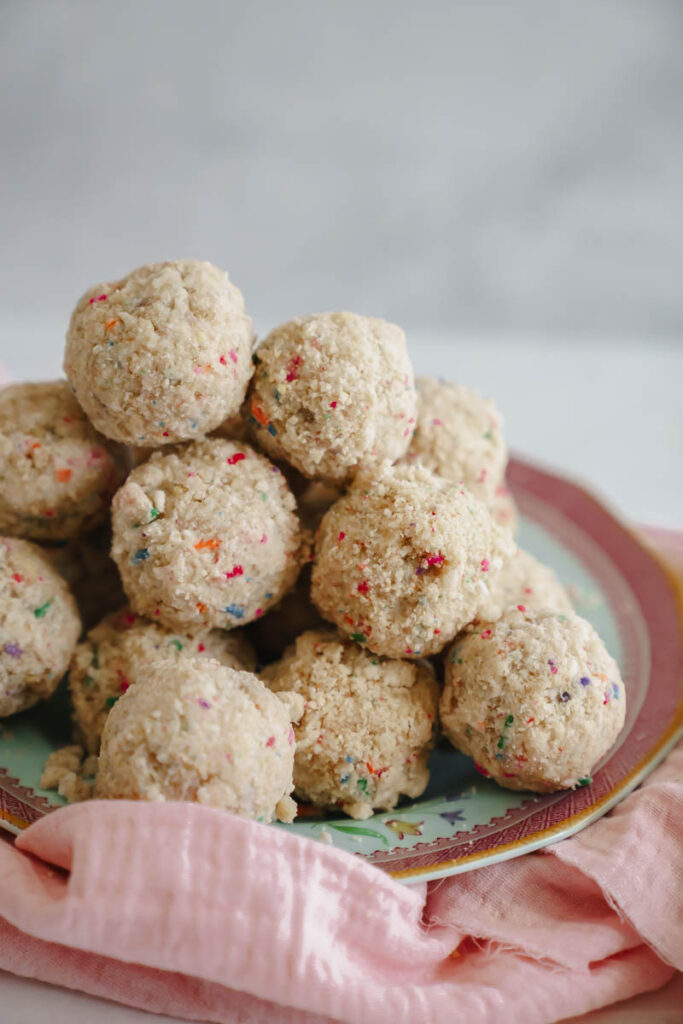
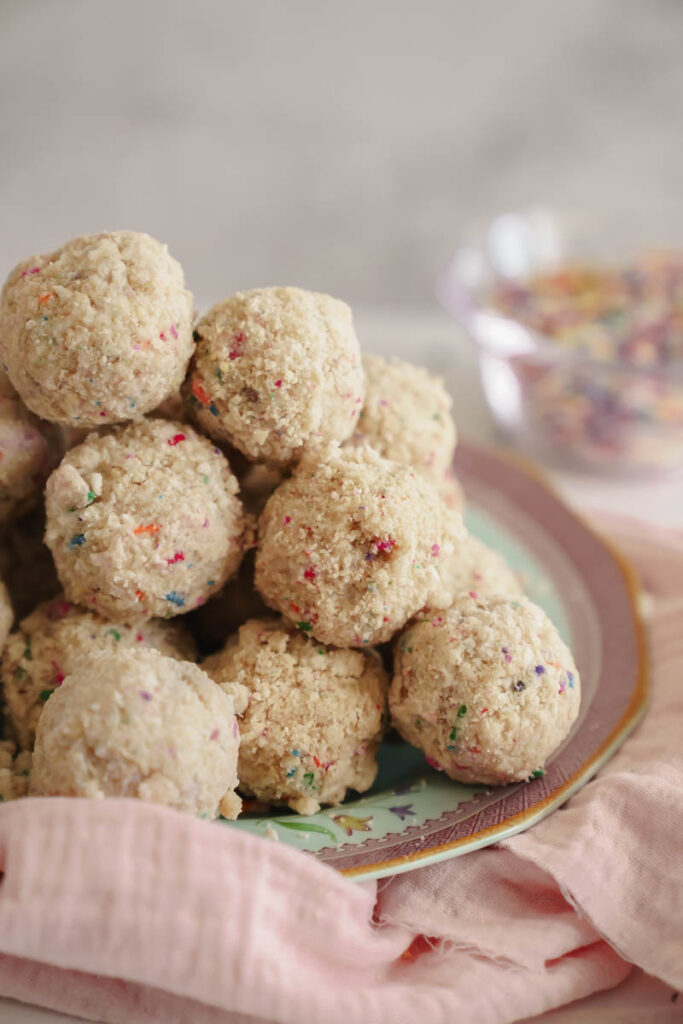
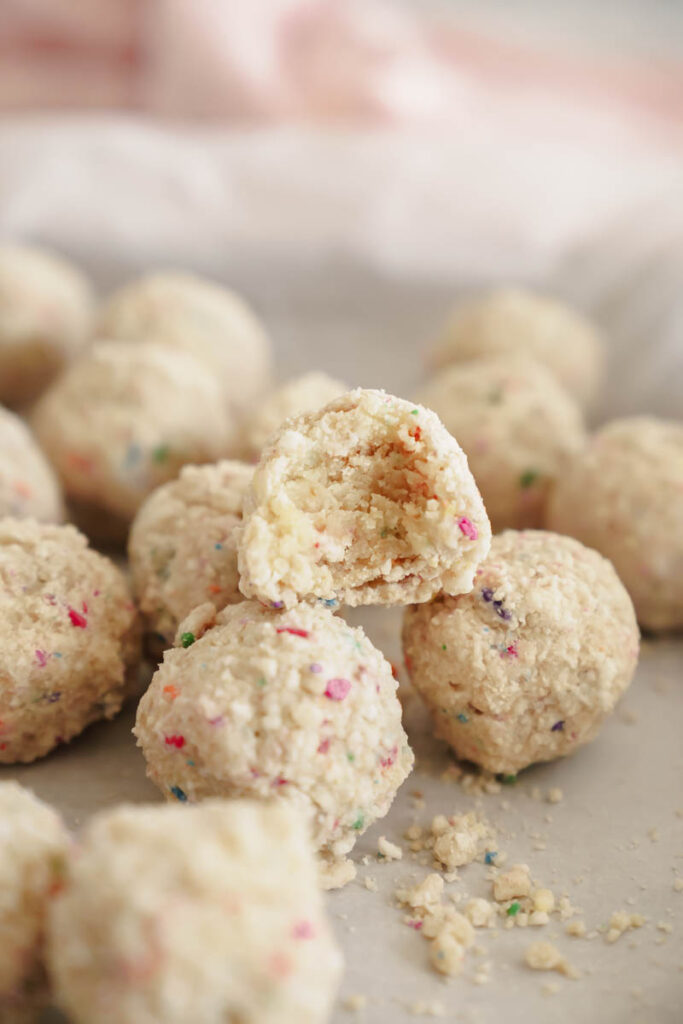
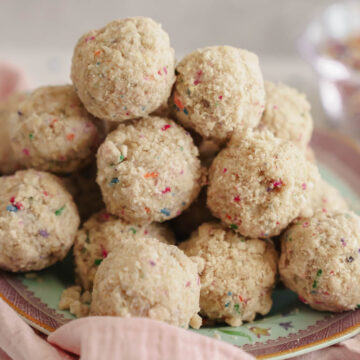
Birthday Truffles - Milk bar style cake balls with funfetti cake, dipped in white chocolate, and covered in cake crumbs!
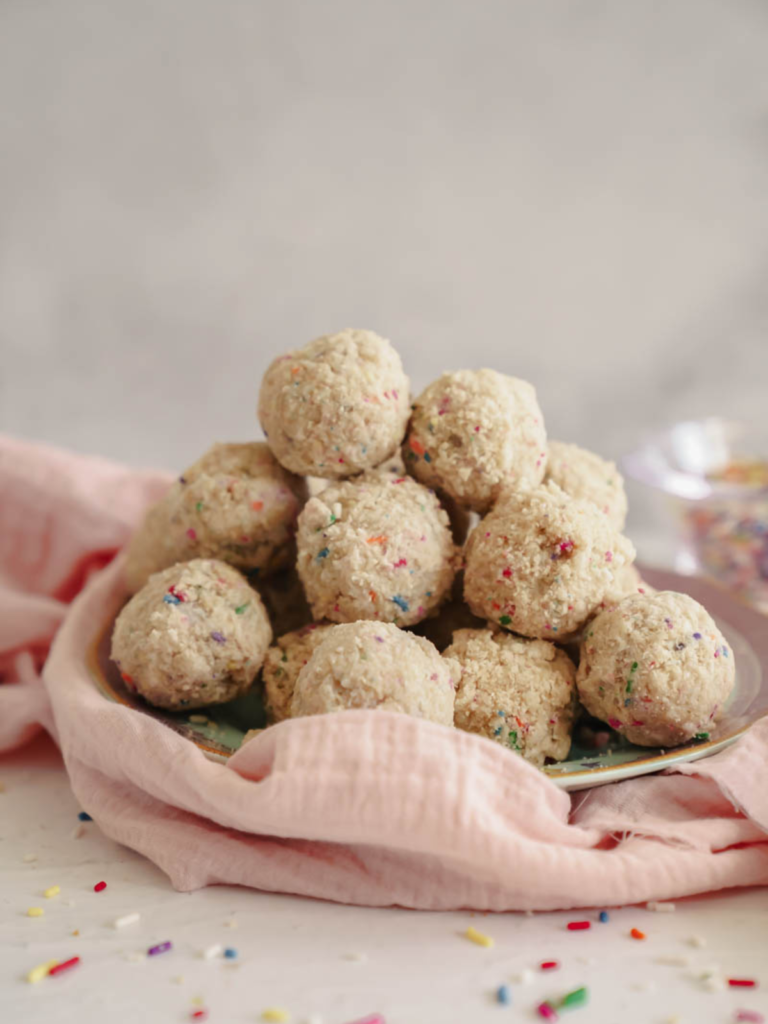
In my opinion, there are just some things Milk Bar cannot be beaten on (if you do not know Milk Bar, it is Christina Tosi's dessert restaurant that is only in select areas). Her Crack Pie is one of the most famous milk bar treats, and is genuinely untouchable. Today, I am dropping my newest attempt at a Milk Bar-esque dessert. These Milk Bar Birthday Cake Truffles are the perfect combination of my homemade cake pop, dipped in a thin layer of melted chocolate, and then covered a delicious coating of Birthday cake crumbs.
So what are you waiting for? Go stretch and ignore those emails and text messages from work, because it is time to make my Milk Bar Birthday Truffles!
Happy Baking! 🙂
- Easy Birthday Cheesecake Cake Recipe
- Best Chocolate Birthday Cookies With Frosting
- The Best Birthday Golden Oreo Blondies Recipe
6 Reasons why I love these epic desserts!
Here are four reasons why I love these single bite Milk Bar Birthday Cake Truffles
- Ratios- The barely-there white chocolate shell is the perfect ration to the cake pop center and the crumbs outside give it a great texture!
- Variability- Although their original design are very must birthday flavor, you could experiment with different colors. Regardless of the decorations, you will love these vanilla-happy goodies!
- Flavor- This recipe takes that nostalgic childhood flavor of our signature cake and turns it into a classic flavor drops that you could eat in a single bite.
- The perfect gift- I love giving these out to friends with a little gift cards and a personalized gift note! They also make great party favors!!!
- Cake Scraps- I will often make these, or a variation of these whenever I have cake scraps. It is an easy way to cut down on waste!
- Rainbow Sprinkles- Guys. I love rainbow sprinkles and you should love them too.
Pantry Essentials - Birthday Truffles
This is not the ingredient list, but just a list of things I think every pantry needs!
- Vanilla Extract- My favorite is the clear vanilla extract from Neilsen-Massey.
- White Chocolate- I really need to start experimenting with the best, but I typically just use Great Value's.
- Large Eggs- Make sure they are room temperature when you are baking!
- All-Purpose Flour- I love King Arthur's All-Purpose Flour. They really care about quality!
- Baking Soda- If you are reading this, GO CHANGE OUT YOUR BAKING SODA!
- Granulated Sugar- What is a pantry without sugar? IDK.
Note: If you do not live by one of Milk Bar's physical stores, they do online orders. I do not think there is free standard shipping, but they do ship within the continental United States and the prices of Milk Bar products are pretty good!
STEP BY STEP - Birthday Truffles
We are doing it like Christina Tosi! Below are how to make these Birthday Truffles, for the full list of instructions, check out the recipe card below!
1. Make the Cake:
- Cream together room temperature butter, granulated sugar, and vegetable oil until light and fluffy.
- Incorporate room temperature egg whites one at a time, followed by sour cream and vanilla extract.
- In a separate bowl, sift together cake flour, baking powder, baking soda, and salt.
- Gradually add the dry ingredients and buttermilk to the butter mixture, alternating between the two. Mix until just combined.
- Fold in rainbow sprinkles gently until evenly distributed.
- Transfer the batter to a prepared cake pan and bake at 325°F until a toothpick inserted into the center comes out clean, about 25-30 minutes.
- Once baked, let the cake cool completely, then crumble it into a medium-sized bowl.
- Add vanilla extract and cream to the crumbled cake, mixing until the mixture becomes moist and can hold its shape.
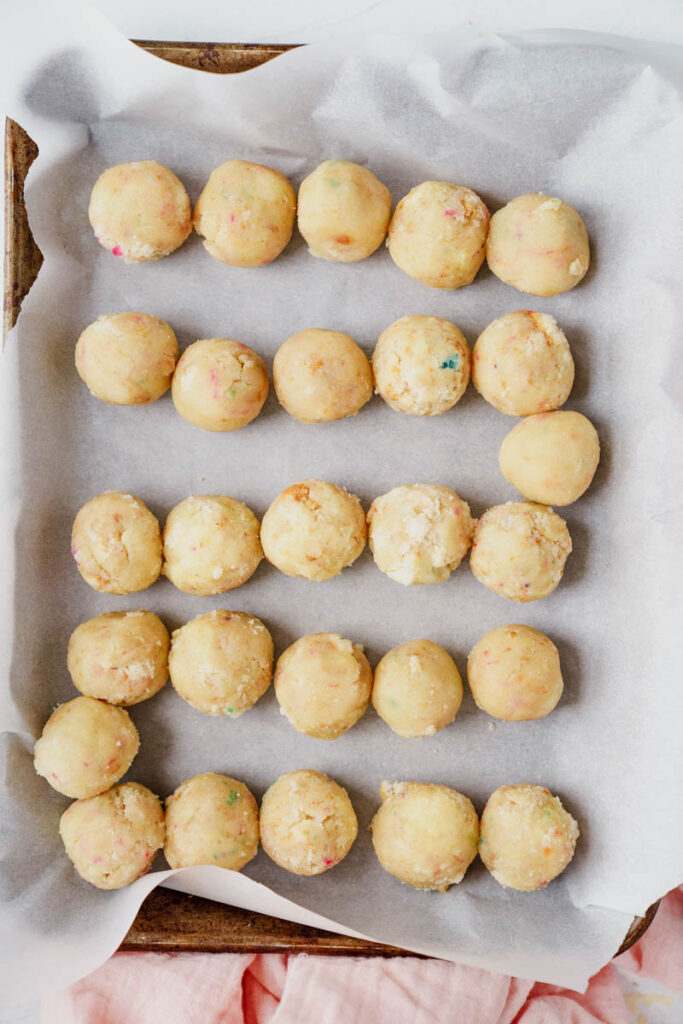
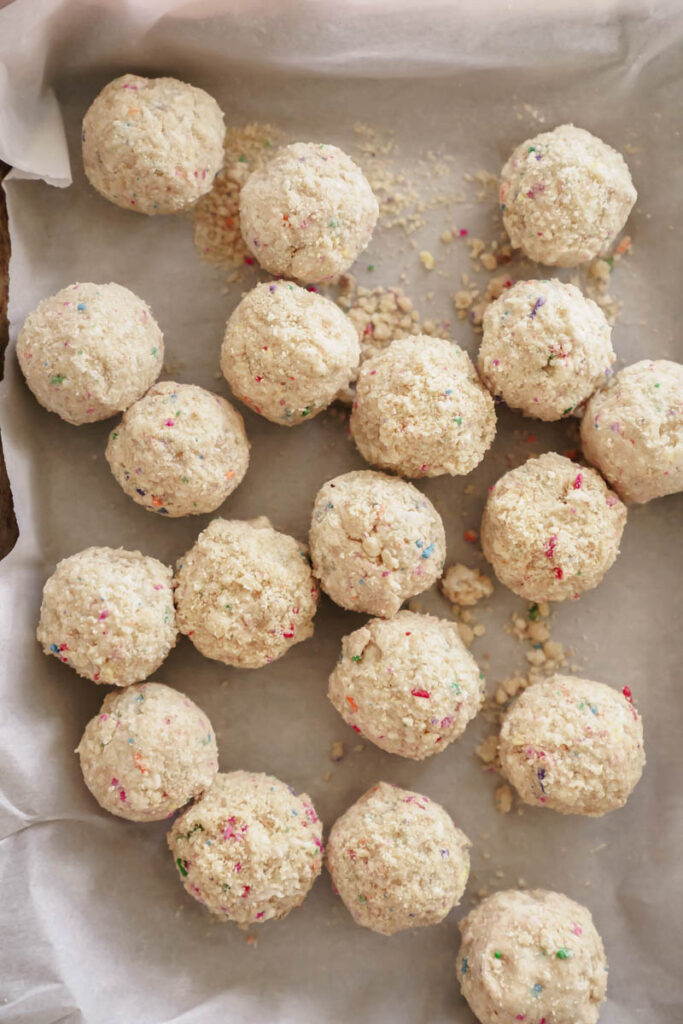
- Scoop small portions of the mixture (size of a ping-pong ball) and roll them into a round sphere using the palm of your hand. Place the formed balls in the fridge to chill while you prepare the crumb coating.
2. Make the Crumb Coating:
- Preheat the oven to 325°F and line a baking sheet with parchment paper.
- In a medium-sized bowl of a stand mixer, combine light brown sugar, granulated sugar, all-purpose flour, salt, and rainbow sprinkles.
- Mix in melted butter and clear vanilla extract until the mixture resembles coarse crumbs.
- Spread the crumb mixture onto the prepared baking sheet and bake until golden brown, about 12-15 minutes.
- Once baked, let the crumbs cool completely before assembly.
How To Assemble
- Melt white chocolate over a double boiler until smooth and creamy. Stir in vegetable oil to achieve a glossy consistency.
- Using a toothpick or skewer, carefully dip each cake ball into the melted white chocolate, ensuring it's fully coated. Allow excess chocolate to drip off by tapping the toothpick against the edge of the bowl. You want a thin layer of white chocolate
- Once coated in white chocolate, immediately roll the cake ball in the prepared crumb coating. Ensure the ball is evenly coated with the crumbs, gently pressing them onto the surface if needed.
- Use your hands to shape the coated ball into a perfect sphere, ensuring the crumbs adhere well to the chocolate layer.
- Place the assembled truffles onto a parchment-lined tray, spacing them apart to prevent sticking.
- Transfer the tray to the refrigerator and chill the truffles for at least 30 minutes. This helps the chocolate and crumb coating set, resulting in a firm and delicious texture.
- Once the truffles are fully set, they are ready to be enjoyed!
Expert Baking Tips
There is no longer any stress in the kitchen! Follow these easy and wonderful tips for making this Milk Bar Style Birthday Truffles!
- Room Temperature is Key: Make sure your butter, egg whites, and sour cream aren't straight from the fridge. Letting them hang out at room temp makes them blend together like old friends, resulting in a smoother batter.
- Whip it Real Good: When you're creaming the butter, sugar, and oil, whip it up until it's light and fluffy. Think of it as giving your cake a little air hug for a lighter texture.
- Mixing Matters: When adding the dry ingredients and buttermilk, take turns between flour and milk. It keeps everything smooth and prevents over-mixing, which can make your cake sad and dense.
- Rainbow Sprinkles: Be gentle when folding in those rainbow sprinkles. You want them evenly distributed without squashing the fluffiness out of your batter.
- Watch the Oven: Keep an eye on your cake while it's baking. You want to pull it out when a toothpick comes out clean or with just a few crumbs clinging on. Nobody likes a dry cake!
- Cool Down: Let your cake chill out completely before crumbling it up.
- Chill, Baby, Chill: Pop those cake balls in the fridge before dipping them in chocolate. It helps them keep their shape and prevents any mid-dip disasters.
- Melt Chocolate with Love: Take your time melting that white chocolate. You want it smooth and creamy, not burnt and lumpy. Stir frequently and give it some TLC.
- Coat with Care: Make sure each cake ball gets a nice even coat of chocolate and crumb mixture.
- Patience is a Virtue: Let your Milk Bar Birthday cake truffles chill in the fridge until they're set and ready to go. It's worth the wait for that perfect, satisfying bite!

Tools I Used To Make This Recipe
- Stand Mixer or Hand Mixer: This will help you cream the butter, sugar, and oil together until light and fluffy, and mix the cake batter evenly.
- 8x8 Inch Square Cake Pan: To bake the cake layer. Make sure to grease and line it with parchment paper for easy removal.
- Mixing Bowls: You'll need both medium and large mixing bowls for combining dry ingredients, mixing cake batter, and preparing the crumb coating.
- Whisk and Rubber Spatula: These are handy for whisking dry ingredients together and folding them into the wet ingredients without overmixing.
- Cookie Scoop or Spoon: For portioning out the cake batter and forming uniform cake balls.
- Baking Sheet: To bake the crumb coating mixture. Line it with parchment paper for easy cleanup.
- Toothpicks or Skewers: These are used to dip the cake balls into the melted chocolate and crumb coating.
- Double Boiler or Microwave-Safe Bowl: For melting the white chocolate gently and smoothly.
- Offset Spatula or Knife: To smooth the cake batter in the cake pan and for other spreading tasks.
- Parchment Paper: Essential for lining the cake pan and baking sheet, preventing sticking and facilitating easy cleanup.
- Cooling Rack: To cool the cake layer and crumb coating mixture after baking.
Frequently Asked Questions
What can I use instead of buttermilk?
If you don't have buttermilk on hand, you can make a substitute by adding 1 tablespoon of lemon juice or white vinegar to 1 cup of milk and letting it sit for 5-10 minutes until it curdles slightly.
Can I make the cake ahead of time?
Yes, you can bake the cake layer ahead of time and store it in an airtight container at room temperature for up to 2 days, or in the refrigerator for up to a week. Just make sure it's completely cooled before storing.
How do I prevent the cake balls from falling apart?
Ensuring the cake is completely cooled before crumbling and mixing with cream and vanilla extract helps bind the cake crumbs together. Chilling the formed cake balls in the fridge before dipping them in chocolate also helps them hold their shape.
Why do my cake balls crack when dipping them in chocolate?
If the cake balls are too cold or the chocolate coating is too hot, it can cause cracking. Make sure the cake balls are at a slightly cool temperature and the melted chocolate is warm but not too hot.
Storing and Freezing
To store Milk Bar-style birthday truffles, place them in an airtight container or a sealed storage bag to prevent them from drying out or absorbing odors in the refrigerator. They can be stored for up to one week.
Freezing - Birthday Truffles
To freeze Milk Bar-style birthday truffles, arrange them in a single layer on a baking sheet and place them in the freezer until they are frozen solid. Once frozen, transfer the truffles to a freezer-safe container or a sealed storage bag, removing as much air as possible to prevent freezer burn. Label the container with the date and store the truffles in the freezer for up to one month. Thaw frozen truffles in the refrigerator overnight before serving.
Remember LEAVE A 5 STAR EVIEW AND A COMMENT if you love the recipe or any questions. Follow me on Instagram, Pinterest, and TikTok. I post so many fun things on all platforms!
OTHER FUN RECIPES YOU SHOULD TRY
- Strawberry Funfetti Cake With Real Strawberries
- Phenomenal and Festive Funfetti Birthday Cake
- The Best Birthday Golden Oreo Blondies Recipe
- Easy Birthday Brookies Recipe (Brownie + Cookie)
Recipe
Birthday Cake Truffles
Ingredients
For the cake
- ½ cup unsalted butter room temperature
- ¾ cups granulated sugar
- 1 Tablespoon vegetable oil
- 3 large egg whites room temperature
- 2 tablespoons sour cream room temperature
- 2 teaspoon pure vanilla extract
- 1 ½ cups all-purpose flour spooned and leveled
- 2 teaspoons baking powder
- ¼ teaspoon baking soda
- ½ teaspoon salt
- ½ cup buttermilk room temperature
- 3 tablespoons rainbow sprinkles
- This is for after baking
- 1 teaspoon vanilla extract
- 2-4 tablespoons heavy cream
For the crumb coating
- ½ cup light brown sugar packed
- ¼ cup granulated sugar
- 1 ½ cup all-purpose flour
- ¾ teaspoon salt
- ¼ cup rainbow sprinkles
- ½ cupmelted butter
- 1 teaspoon vanilla extract
- 10 ounces meltable white chocolate
- 1 teaspoon vegetable oil
Instructions
For The Cake
- Preheat your oven to 325 degrees F. Spray an 8×8 square inch cake pan with cooking spray, line with parchment paper, and spray again. Set aside.
- In a medium sized bowl, whisk together the flour, baking soda, baking powder, and salt. Set aside.
- In the bowl of a stand mixer fitted with the paddle attachment, beat the butter, oil, and sugar on high until fluffy and smooth, about 4 minutes.
- With the mixer on medium speed, start adding the egg whites, one at a time, to the bowl, scraping the bottom and the sides of the bowl between each addition. After all the eggs have been added, beat on medium speed for 1 minute. Add the sour cream and vanilla. Beat on medium speed for 30 seconds.
- Turn the mixer on low and add half of the flour mixture and half of the buttermilk to the butter mixture and mix until fully incorporated. Finally, add the rest of the flour mixture and the rest of the buttermilk, while mixing on low. With a rubber spatula, fold in the sprinkles.
- Add the the batter to the prepped pan, and carefully smooth the batter with a small offset spatula and bake until a toothpick comes out clean, or with only a few crumbs on it, about 25-30 minutes. Depending on your oven.
- Let the cake completely cool, once the cake has cooled, place the cooked cake into a medium size bowl, add the cream and vanilla extract. Mix until the mixture becomes moist and can hold its shape.
- Using a small cookie scoop, scoop and roll in the palm of your hands into small balls. Place in the fridge while you make the crumb coating on the outside.
For the outside crumb
- Preheat the oven to 325°F and line a baking sheet with parchment paper. Set aside
- In a medium size bowl, combine the sugar, flour, baking powder, and salt use a fork to combine. Once combined, add the melted butter and vanilla extract. Stir together until the mixture starts to come together and looks gritty. It should resemble crushed graham cracker. Add the sprinkles and stir to combine. Make sure there are no large clumps. You want a friend crumb.
- Transfer the mixture out onto your prepped baking sheet into a and bake for 7 minutes, take the pan out of the oven and with a fork, gently mix around the crumb mixture. Bake for 5 more minutes. Let the mixture completely cool before assembling.
- When everything is ready to assembly, melt the white chocolate over a double broiler and once completed melted, add the vegetable oil.
- Make sure the chocolate mixture is slightly warm before dipping your cake balls into it.
- Using a toothpick or a skewer, dip the cake ball in the melted white chocolate, use the edge of the bowl to wipe off the excess chocolate, you want the thinnest coat of white chocolate.
- Once the chocolate has been wiped off, roll the cake ball onto the sprinkled crumb. Remove it from the skewer and gently roll it together in the palm of your hands to make it a perfect ball.
- Repeat the process for all cake balls, then place them on a parchment-lined tray to set.
- Allow the cake balls to set up for 30 minutes in the fridge before serving!
Jace McDonald says
These are so so good